
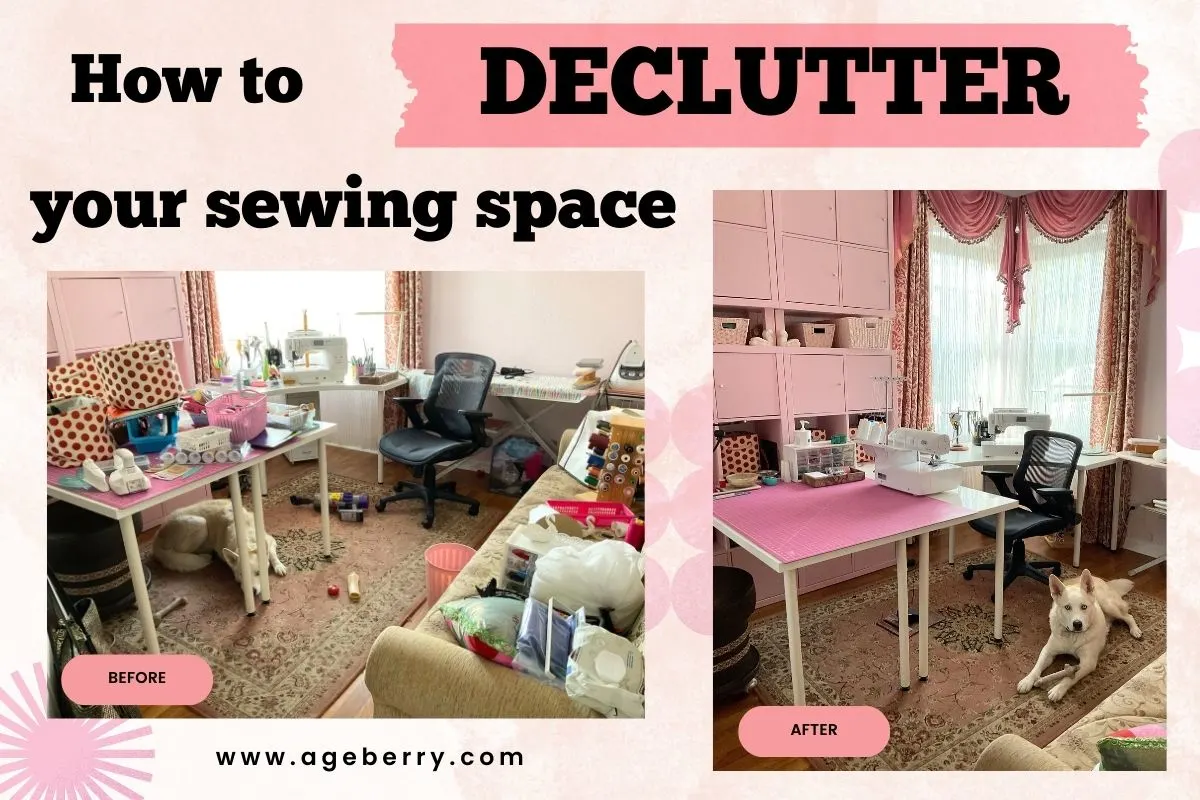
Is your crafting clutter keeping you from accomplishing your sewing goals? If so, it’s time to declutter your sewing space! Here are some tips for decluttering your crafting area and maintaining your newfound organization.
If there’s one area of the house that tends to get messy, it’s the crafting space. Creating new things is messy (but hopefully enjoyable and fulfilling) work, so it’s no wonder that clutter can quickly take over your sewing space.

If you’re noticing that it’s difficult to find the items you need to make progress in your projects, it’s probably time to declutter.
A clean and organized sewing space is about much more than aesthetics. Decluttering your sewing space and eliminating the chaos promotes functionality, efficiency, and creativity.
Decluttering vs. Organizing
These terms go hand in hand and are often used interchangeably, but it seems they don’t mean the same thing.
Decluttering simplifies a space by removing unneeded or unused items. On the other hand, organizing arranges the remaining items in an efficient and easily maintainable way.
Starting the Herculean task of decluttering your sewing space can be as tough as deciding which of your children is your favorite – impossible and full of emotional challenges. It’s a delicate dance of “Should it stay or should it go?” with each piece of fabric and every spool of thread.
And let’s be honest, when it comes to that gorgeous piece of silk you’ve been saving for a decade because it’s too beautiful to cut, or the trusty old serger that’s followed you from house to house more loyally than your dog, the thought of parting ways seems downright wrong.
But “declutter” doesn’t mean you have to give up on everything in your space.It simply means giving your sewing space a little breathing room. You’re not getting rid of your treasures; you’re merely relocating them to a spot where they won’t be buried under an avalanche of fabric scraps every time you look for your pinking shears.
Imagine trying to find a needle in a haystack; now imagine that haystack is made of assorted threads, half-finished projects, fabric scraps, and “this will come in handy one day” gadgets. It’s time to declutter your sewing space!
So, take a deep breath, arm yourself with a stash of storage bins, and prepare to tackle the textile tangle. You might find that serger you’ve been carting around finally has a chance to retire gracefully to a shelf of honor, while that intimidating silk might just get its moment to shine.
Decluttering isn’t about stripping away your tools and materials; it’s about curating your creative environment to inspire your next masterpiece. And who knows, in the clear expanse of your newly organized sewing sanctuary, you might just find the courage to finally make that first cut into the silk. After all, it’s only been a decade.
How To Declutter Your Sewing Space Step-By-Step
My sewing room used to be a disaster zone, a place where fabric avalanches were a daily hazard and finding a pair of my favorite scissors was a treasure hunt. But then, I came up with a simple plan to clean it up, and it worked wonders. Now, my sewing space is a place I really enjoy. It’s so nice to be in there, surrounded by all my fabrics and the tools I need, without any of the clutter (well, most of the time, that’s it). It’s become a relaxing spot where I can focus on my sewing projects.
1. Set Decluttering Goals
Starting the decluttering process without a plan is like navigating a road trip without a map (or navigation system!). Determining your goals ahead of time will act as a compass, steering your efforts and keeping you on track.
Define What A Decluttered Sewing Space Looks Like For You
Imagine your ideal sewing space. Is it minimalist with just the essentials, or does it showcase your materials and projects? Be specific about how you want your space to feel and function. This vision will guide your planning and keep you motivated.
Determine The Main Functions Of Your Sewing Space
Your sewing area may serve multiple purposes. Perhaps it’s a place for sewing, storing patterns, and cutting fabric. Figuring out the ways you plan to use the space will help you decide what items you want to keep and which ones you want to remove to create more room (and reduce clutter).
Set Achievable And Clear Objectives For The Decluttering Process
Starting your sewing space transformation will certainly feel overwhelming at first, but setting specific target points should keep you on track. Break down your decluttering project into manageable steps according to what you’d like to achieve each day (or week).
Here’s an example of how you might start to tackle your decluttering journey:
- Day 1: Sort through and organize fabrics
- Day 2: Tackle sewing patterns and books
- Day 3: Organize sewing tools and equipment
- Day 4: Organize embellishments, trims, and accessories
Note: Some of the links on this page are affiliate links. This means I will receive a commission if you order a product through one of my links. I only recommend products I believe in and use myself.
2. Prepare For Decluttering
Before you get started, I recommend doing a little prep work to set yourself up for success.
Schedule uninterrupted time – this will allow you to fully focus on the task and be more efficient. Decide how much time you need to schedule based on the task you’re doing and the state of your space.
Gather all the tools you’ll need – you’ll need things like trash bags for discarding things, maybe boxes for donation items, and a variety of containers (especially clear ones with lids) for organizing what you choose to keep.

Stackable Plastic Storage Bins with Lids
Clear out a work area – this will be where you can sort everything out, such as a table, the floor, or anywhere with enough space to make piles without getting in the way.
Get in the right mindset – staying positive will be important. I like to play some favorite music when I declutter, or you may choose to invite a friend to join you for support.
3. Sort Through All Your Sewing Supplies
What do you always need and what’s not used often and causing clutter? Here’s how to make that distinction.
Remove Everything From One Category in Your Sewing Space
Start by completely clearing out all items in one category (for example, all your fabrics) and lay everything out on a large surface (I prefer using the table and bed). Seeing all your items allows you to spot redundancies, identify essentials, and sort everything effectively.
You may choose categories such as:
- Fabrics
- Tools and notions (threads, needles, etc.)
- Patterns, books, and magazines
- Embellishments, trims, and accessories
The day I decided to declutter and take stock of my fabric stash, I pulled everything out onto the table and bed – it was quite the sight. When my husband walked in, he couldn’t help but exclaim, “Oh, it looks like a fabric bomb exploded in here!” But I needed to see all the fabric I had in order to make those tough decisions about what to keep and what to part with. It was the only way to really understand the extent of my collection and to start the process of decluttering.


Use The KonMari Method
If you aren’t familiar with the KonMari method, it will help you decide which items to keep and which ones to discard. But instead of asking if each item sparks joy, ask yourself if it sparks creativity in the near future or if it’s just sparking the onset of a panic attack as you try to navigate the chaos.
For example, if a piece of fabric lifts your spirits, keep it. On the other hand, if you don’t feel that you like the fabric while looking at it, say goodbye and decide how best to discard it.
Take this fabric I absolutely adore – I can already picture the nice summer dress I’ll make from it, and I’ve got the perfect pattern for it too. So, that’s a definite ‘yes’ for staying in my sewing room.


I found this fabric at Mood Fabrics’ website, moodfabrics.com, and I just couldn’t resist buying it.
On the other hand, there’s this fabric I got from my mother-in-law. Maybe it was nice 30 years ago, but now it just doesn’t excite me. I can’t see myself using it, so I’ve decided to let it go and give it to charity. Someone else might find it just right for their project.


And then there are these scissors. They’ve been with me for ages, and they used to be top-notch, made in the USA, but now they just won’t cut properly. Since I have two other pairs that work well, I’m going to say goodbye to these old ones. It’s all about making space for the tools that help me create and letting go of the rest.


✅ Related tutorial: Cutting Tools For Sewing: The Ultimate Guide
4. Organize Fabrics
So, you have chosen all the fabric you want to keep in your sewing room. Now you need to organize it!
Well, organizing fabric really is a tough job. I’m convinced that fabrics have a secret life of their own – turn your back for a second, and they’ve multiplied! One day you have a neat stack, and the next, you’re wading through a sea of cottons and silks that seemingly appeared out of thin air.
But despite the challenge, getting your fabrics in order is totally worth the effort.
So, to keep the chaos at bay, I’ve gotten creative with my organization. I fold each piece, sort them by type, and then stack them where I can see and admire them – and more importantly, find them when I need them. After that my sewing room feels more like a creative space and less like a fabric jungle. A little bit of organizing goes a long way in making your sewing space a place where you can actually get some sewing done!
Sort Fabrics By Type, Color, Or Project.
You can sort your fabrics into distinctive piles according to what makes your creative process flow more smoothly. Here are some possibilities:
By Type – group cottons, silks, knits, etc., to simplify finding the right material. I mostly use this method. Here are my silks and my knits.


✅ Related tutorial: How To Sew Knit Fabric | 23 Expert Tips For Beginners
By Color – arrange fabrics by color family, which is especially helpful for projects requiring color coordination (like quilting). All my solid colors live in one place. Then, there’s the printed fabric, which I keep separate from the solids.


By Project – keep project-related materials together if you prefer a project-oriented setup. This is especially good for quilting fabric.
✅ Related tutorial: Quilting Cotton: The Essential Fabric for Quilters
Decide On A Storage Method That Works For Your Space
Choose a storage method that caters to the size and design of your sewing space:
- Folding – neatly fold fabrics and stack them on shelves or in drawers. This method makes it easy to see what you have at a glance.
- Hanging – suspending larger pieces of fabric on hangers can prevent wrinkles and make use of vertical space.
- Using bins – clear bins or baskets can be labeled and neatly stacked (or slid under tables), offering a tidy and versatile fabric storage solution.


For even more ideas, please read my post on How To Store Fabric.
5. Manage Patterns And Projects
I know from experience just how frustrating a huge mess of patterns can be. Organizing them will transform your collection of sewing patterns into a beacon of inspiration!
Organize Sewing Patterns By Category
Group the designs you’ve gathered over time. You can do it by garment type (dresses, outerwear, etc.), complexity, designer, or whatever makes sense for your sewing preferences. The goal is to be able to find what you want quickly and easily.
Once you choose your categories, decide how you want to store them. There are several options so you can pick what works best for you to find what you need without rummaging through them all:
- File Boxes – label your hanging folders according to your chosen categories.
- Binders – separate and label your categories with tabs.
- Shelving – I have seen magazine holders work well when storing patterns on a shelf. Label the spines according to your categories.
- Digital – if you have digital patterns on your computer, organize them in folders (and back them up on an external hard drive).
If you want even more ideas and tips for organizing your patterns, please read my post on How To Store Sewing Patterns.
Make A Pile Of Unfinished Projects And Decide Which To Keep
We all have those unfinished products lurking around: half-sewn dress, partially pieced quilt, etc. In order to declutter them, you’ll have to sift through your pile.
Pick up each project, one by one, and ask the hard questions. Can I see this fitting into my life now? Or will I finish this probably someday, but not right now? How long ago did I start this?
Years ago, before we moved to Florida, I began a project with a piece of lace fabric. I had it all cut out and started piecing together a dress. But, oh-oh, I I didn’t have a zipper for it. And then, with all the hustle and bustle of moving, I completely forgot about the whole thing.


Now, after all this time, I’ve stumbled upon it again, and you know what? I still really like it. So, I’ve decided it’s time to finish what I started. I’m going to get that zipper, and finally, this lovely lace dress will be done. So it’s never too late to complete a project, especially one that you’re fond of.
Well, speaking of zippers – for lace, chiffon, georgette, voile and other very lightweight fabrics, you will need special zippers with very thin flexible lace. I usually buy these from Amazon.

Invisible zippers for lightweight fabrics
So, some projects may earn a spot back on the shelf. Others, well, need to be discarded.
Let go of the projects that no longer serve you by donating them to a charity that might appreciate the materials or even the project itself. You could also repurpose the fabric for new projects, or if they’re beyond saving, just put them in the garbage bin.
6. Tackle Notions And Tools
Pay special attention to the small items that are easy to overlook yet vital for your projects. Here’s how to streamline your notions.
Threads – group your threads, using a thread rack or clear storage boxes for easy visibility. (Check out my post about great Sewing Thread Organizers). Then, discard any that are frayed, too old, or tangled beyond use.


I bought this rack from Amazon and I like it very much.
 360° Fully Rotating Wooden Thread Rack/Thread Holder Organizer for Sewing, Quilting, Embroidery, Hair-braiding and Jewelry")
Fully Rotating Wooden Thread Rack
Buttons and Zippers – use small, divided containers or ziplock bags to categorize buttons and zippers by size, color, or material.


Next, focus on the tools that you use as you sew. Place scissors, rulers, rotary cutters, and other equipment in an order that suits your sewing rhythm.
Scissors and rotary cutters – consider hanging them on a pegboard above your work area or place them in a holder on your table or on magnetic strips nearby so you can grab them without looking.


Needles – to store sewing machine needles, keep them organized in a container and also use a needle book for easy access and safekeeping.


✅ Related tutorial: How To Choose The Right Sewing Machine Needle For Your Project
Rulers – store vertically in a bin or canister or store horizontally in a drawer with dividers to prevent them from getting buried under other items.
Prioritize easy access to items you use constantly so they’re always at hand when inspiration strikes.
My rule of thumb is: If you reach for it often, keep it close. If you don’t, store it out of sight but within reach.
7. Address Sewing Machines And Equipment
Tending to your sewing machines and equipment is just as important as organizing fabric and notions! I recommend designating a specific spot for your machines to anchor your workspace.
Clean And Maintain Your Equipment
Protective cover – dust can be a machine’s worst enemy. When not in use, shield your machine with a cover to keep it clean and prevent dust particles from settling in sensitive areas. You can easily make one to keep it clean and protected. If you’ve got the original case or a hard case, that’s even better for keeping out the dust and preventing any accidental damage.
✅ Related tutorial: Sewing machine cover tutorial
Regular maintenance – Your sewing machine is your “right hand” in your sewing projects, so give it some TLC on a regular basis to keep it humming along. Dust off any lint or thread bits that accumulate after each project. Use a small brush or mini-vacuum to clean tight spaces and under the needle plate.
Oiling as directed if necessary – Check your machine’s manual for specific oiling instructions. Some machines are self-lubricating and don’t require additional oil, while others will benefit from a drop or two in designated areas to keep moving parts running smoothly.
✅ Related tutorial: Sewing Machine Oil | Top 10 Questions Answered
Needle replacement – switch out dull or damaged needles regularly. Sewing with a needle that’s seen better days can damage your fabric and harm your machine.
Professional service – just like a car, your sewing machine benefits from an occasional tune-up. Take it to a technician for a thorough service every couple of years, or more often if you sew frequently. They can get into the nooks and crannies you may miss and make sure everything’s in top-notch condition.
Storing Machines And Equipment
Storing a sewing machine and serger in a way that keeps your sewing room organized is important. First off, if you’re not using them regularly, consider tucking them away in a designated storage space.
For the sewing machine, use a dust cover to prevent lint and dust. For the serger, it’s much the same. If you’re tight on space, think vertically. Shelves are a great way to keep your machines accessible but off your main workspace. Just make sure they’re sturdy enough to hold the weight.
If you use your machines more frequently, you might want to keep them within easy reach. A sewing cabinet or table with an extension that allows the machine to sit flush with the surface can be a great space-saver. Some tables even have a lift mechanism, so you can raise your machine when you need it and lower it when you don’t.
✅ Related tutorial: How to Choose the Best Sewing Table
For the serger, since it’s used less frequently than the sewing machine for many people, you might store it on a lower shelf or in a rolling cart that can be tucked away under the table or in a closet. The key is to keep them accessible without letting them dominate your sewing space.
And let’s not forget about cords and pedals. Keep these neatly to prevent a tangled mess. I’ve found an interesting solution for my cords and pedals that keeps them out of sight but always within reach. I use a storage stool that I’ve reupholstered with vinyl. It looks chic and it’s super practical. It’s the good size to sit on while I’m sewing, so it doubles as a seat.


8. Create A System For Scraps
Like me, I’m sure you’ve got a colorful cascade of fabric scraps, but it’s important to declutter with a system that mirrors your sewing preferences and style. Consider how you use these bits and pieces. Are they for patchwork quilts or for adding funky flair to other projects?
When it comes to sorting through my scraps, I’m pretty meticulous because I just can’t bear to part with them – they’re all so nice! My scrap container filled up before I knew it, and I’ve even started filling a second one. To keep my sewing room from getting cluttered, I moved my scraps out to the garage. You could do the same, or find a spot in the basement if that works better for you.
There’s absolutely no way I’m throwing away my scraps. They’re like little memories of past projects and potential future creations. I’m open to the idea of donating some. There are plenty of people and places that would be thrilled to have them for their own projects.
I’ve made tons of projects from these scraps over the years. It’s amazing what you can create with what might seem like throwaway pieces. Every now and then, I like to sift through my collection and even organize them, usually by size. It makes it easier to pick out what I need for a new project. Plus, it feels good to see all the possibilities laid out in front of me, ready for my next burst of inspiration.
✅ Related tutorial: 17 Fun And Unique Fabric Scrap Projects


Regularly Sort Through Scraps
Unfortunately, decluttering your scraps pile isn’t a one-and-done type of project. If you sew regularly, dive into your scrap collection to sort, reorganize, and eliminate pieces you no longer need every few weeks to keep it in check.
9. Maintain A Decluttered Space
It’s one thing to declutter your space, but maintaining it is an ongoing task. Keep your space open and inspiring by committing to a couple of new habits.
First, set a regular cleaning schedule, allocating time each week (or month) to tackle clutter before it takes over. In addition, sweep or vacuum the space and wipe down surfaces to ensure they’re dust-free.
And second, put items back in their rightful places immediately after using them. If you add new materials or tools to your sewing space, assign a “home” for them immediately so that you can always find them when you need them.
These simple tasks can save you considerable time and prevent the chaos from creeping back. With a little practice, these tasks will become habits so that you do them automatically and don’t need to think about it.
10. Personalize Your Space
Personalizing your sewing room is all about making the space truly yours. I started with color. I chose a color scheme that really speaks to me, something that energizes me but also feels cozy. I’m all about pink color, so I went all out and bought some lovely pink KALLAX wall units from IKEA. The walls? I painted them a soothing light pink that just makes the whole room feel warm and inviting.


✅ Related tutorial: IKEA Sewing Room Ideas for small spaces
Then, there’s lighting. Good lighting is very important, but it’s also an opportunity to add character. I wanted something unique, so I jazzed up my fan with pink paint and some sparkly mica pieces (from Lowes). A little bit of glue and some creativity, and now it’s not just a fan – it shines light in the most magical way.


Artwork and decorations are next. Artwork in a sewing room adds so much personality, and for me, it’s all about this clock in the shape of a sewing machine. It’s not just about keeping time; it’s a nod to my passion. You can go wild with whatever you like on your walls – make it personal, make it you.


Comfort is key, too. I invested in a really good, supportive chair that makes those long hours at the sewing machine much more enjoyable.


✅ Related tutorial: Best Sewing Chairs For Comfort In Your Sewing Room
Storage can be personalized as well. I use Drawer Storage Hardware and Craft Cabinets


You can also have plants. A bit of greenery breathes life into the space and makes it feel more natural and calming. But I’ve had to skip the plants; there’s just no room for them with all my fabrics and tools. But I’ve got my dogs who keep me company while I work. They’re always there, adding life and love to my pink palace of sewing.


All these elements together make my sewing room feel like an extension of me.
11. Evaluate And Adjust
Take a moment to step back and look at your organized sewing area.
As you sew over the next few days or weeks, take a moment to assess your newly decluttered space. Is everything working as well as you hoped?
Maybe that bin isn’t as handy as you thought, or perhaps the method you used to sort your patterns makes it difficult to find what you need quickly.
Be ready to make adjustments to your setup. Switching up your storage solutions, reorganizing your tools, or even just shifting a table can make improvement in your sewing workflow.
Final Touches
You did it! Take a moment to look around and acknowledge the transformation. The clear surfaces, neatly organized fabrics, and accessible tools are all direct outcomes of your hard work.
Did you like this guide? If you did, don’t forget to bookmark this pin (see below) on your sewing Pinterest board! That way, you can easily return to this article on decluttering your sewing space whenever you’re ready to start organizing. Plus, make sure to follow me on Pinterest to stay updated with more sewing advice, step-by-step tutorials, and creative inspiration!


latest posts
- Think You Know Zippers? This Installation Guide Might Surprise You
- Why Does Your Seam Ripper Have a Red Ball? Discover Its Purpose!
- Topstitching Troubles? This Simple Trick Will Turn It Around Instantly!
- How to Sew Shirring: A Step-by-Step Guide to Elastic Thread Gathering
- Are Self-Threading Needles Really Useful?
- Amazon Spring Sale: Best Choices
- Elevate Your Prom Look: A Guide to 10 Neckline Choices (2024)
- No Pattern, No Problem: Turn Scraps into a Quilting Masterpiece
- Prom Perfection: A Guide to Choosing the Perfect Dress Color (2024)
