
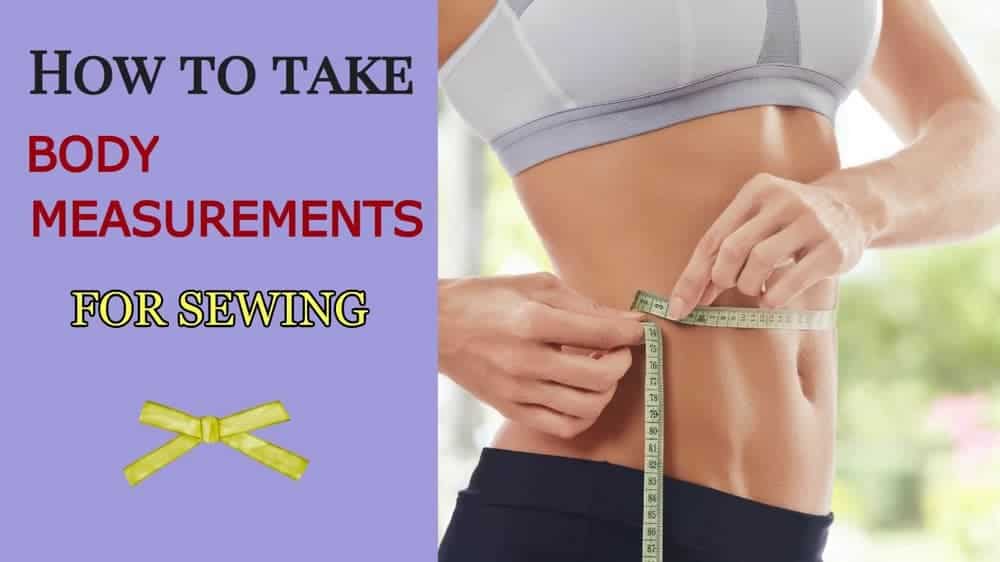
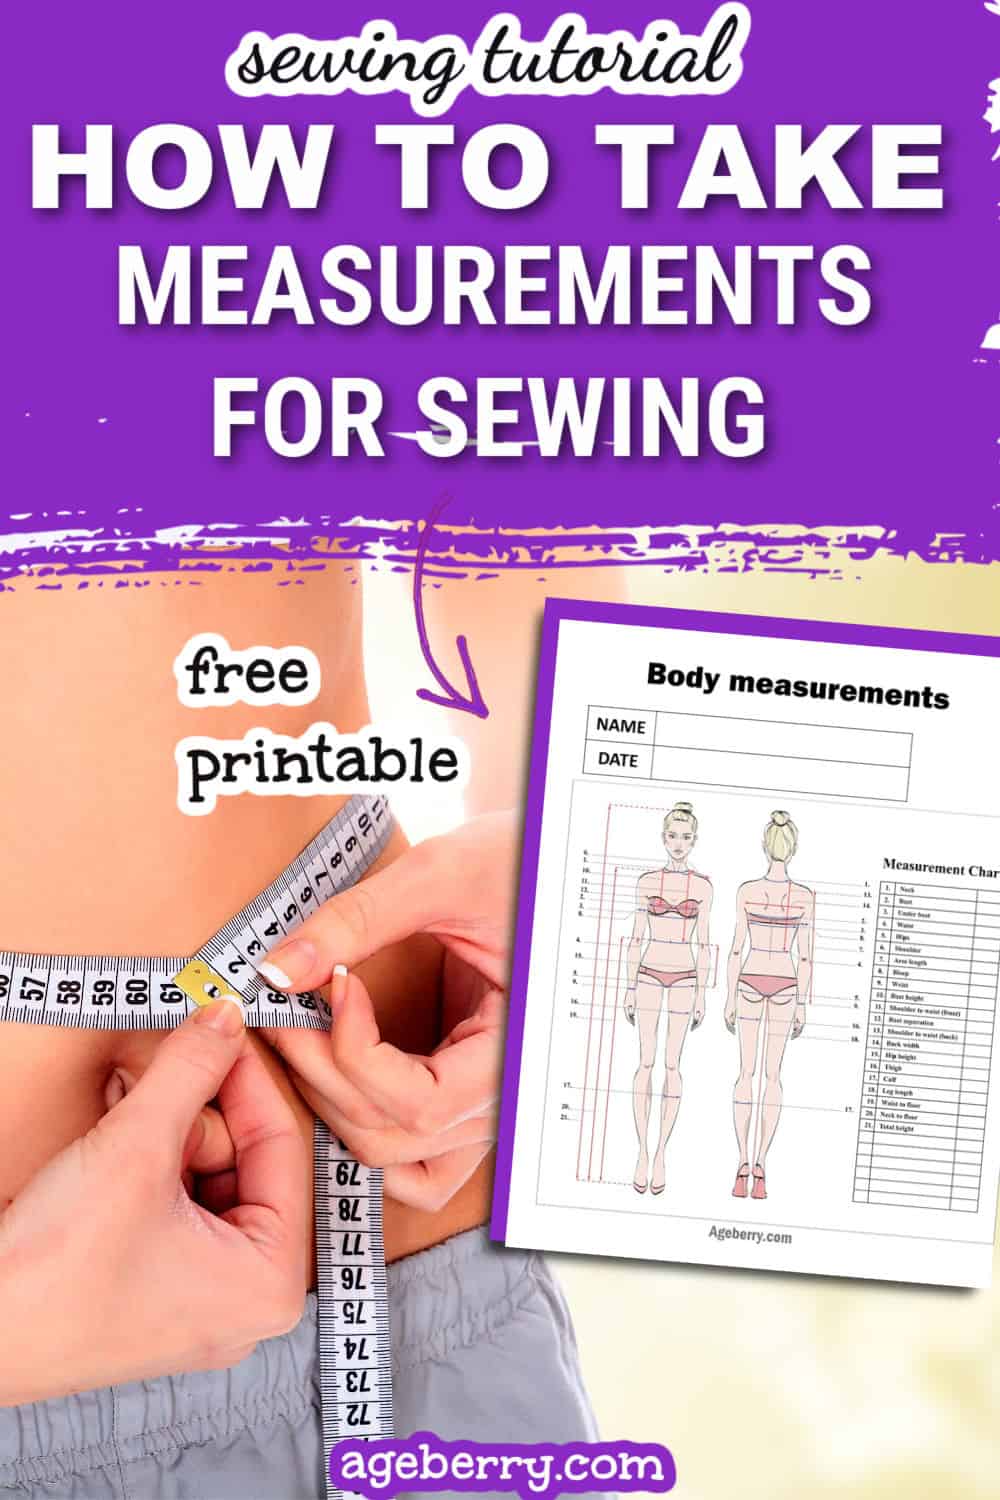
Every sewing project starts with taking measurements. It’s even more important to take your own body measurements for sewing clothes. If you’re struggling with how to measure for sewing, this tutorial on how to take body measurements will help.

One of the first steps in sewing clothes is selecting the right pattern size. Even if your body measurements don’t exactly match one of the pattern sizes, fewer adjustments will be needed if you get the correct size at the beginning of your project.
The sizes that come from ready-made clothes and patterns are only a general indication of the body measurements. In reality, each body is different. For example, even if you do wear a size 8, a general size 8 may never fit you perfectly or in all dimensions.
Taking body measurements before sewing a piece of clothing is an absolute must.
Of course, accuracy is important in taking body measurements. We have to be honest here and accept the reality of our bodies. It just doesn’t pay to cheat because the result will be ill-fitting clothes. Besides, if you have a problem, the first step in correcting it is acknowledging it.
In this post, I’ll present how to take the body measurements that you’ll need regardless if you sew with one of the available commercial patterns or draft a pattern yourself.
✅ Related tutorial: Fabric conversion chart calculator
Why do you need to measure yourself?
There are three main reasons for taking accurate body measurements for sewing:
- To choose the proper size pattern when using commercial patterns (paper patterns or PDF). In the USA, I saw pattern sizes from 4 to 24, but they all differ from the sizes of ready-made clothes. Also, paper patterns vary between pattern designers because they use their own measurements. For example, I am a size 10 for ready-made clothes and a size 12–14 for Simplicity patterns.
- To draft the pattern properly. If you would like to make your own pattern, you have to know your measurements.
- To make fitting adjustments to commercial patterns.
I can’t stress enough that your measurements have to be honest. Please don’t try to make it smaller if you want a good fit (not too tight, not too loose).
Note: Some of the links on this page are affiliate links. This means I will receive a commission if you order a product through one of my links. I only recommend products I believe in and use myself.
What equipment do you need for taking body measurements for sewing?
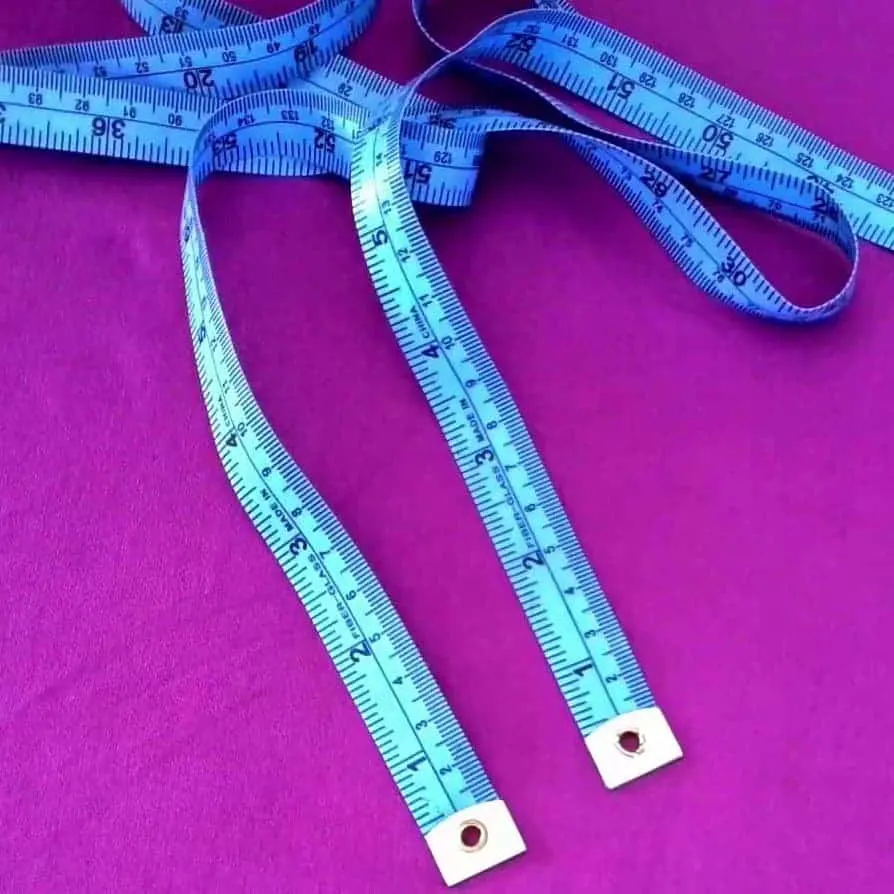
The essential tool you need to measure yourself accurately is a measuring tape.
Choosing a measuring tape may seem like a simple task, but it’s important to have a tape that doesn’t stretch, or you may end up with distorted results. Remember that tapes may inadvertently come into contact with hot surfaces (such as an iron or steamer). In those instances, plastic tapes will stretch.
The best is to choose a fiberglass tape and verify from time to time that it’s still good.
Do you know that measuring tapes can use different units of measurement? Some of them are only in centimeters, while some of them have only inches. And others have both inches and centimeters!
Perhaps, you will be interested in reading my other tutorial: All you need to know about a measuring tape for sewing.
As for me, I like to use a measuring tape that starts with 0/1 on BOTH ends. I think they called them DUAL SIDED, and I don’t see them for sale often. I bought mine in New York, and I found one online, but it isn’t always available.
I just can’t use the other type that they sell in most fabric stores because I don’t like to lose a lot of time searching for the proper end to start measuring.

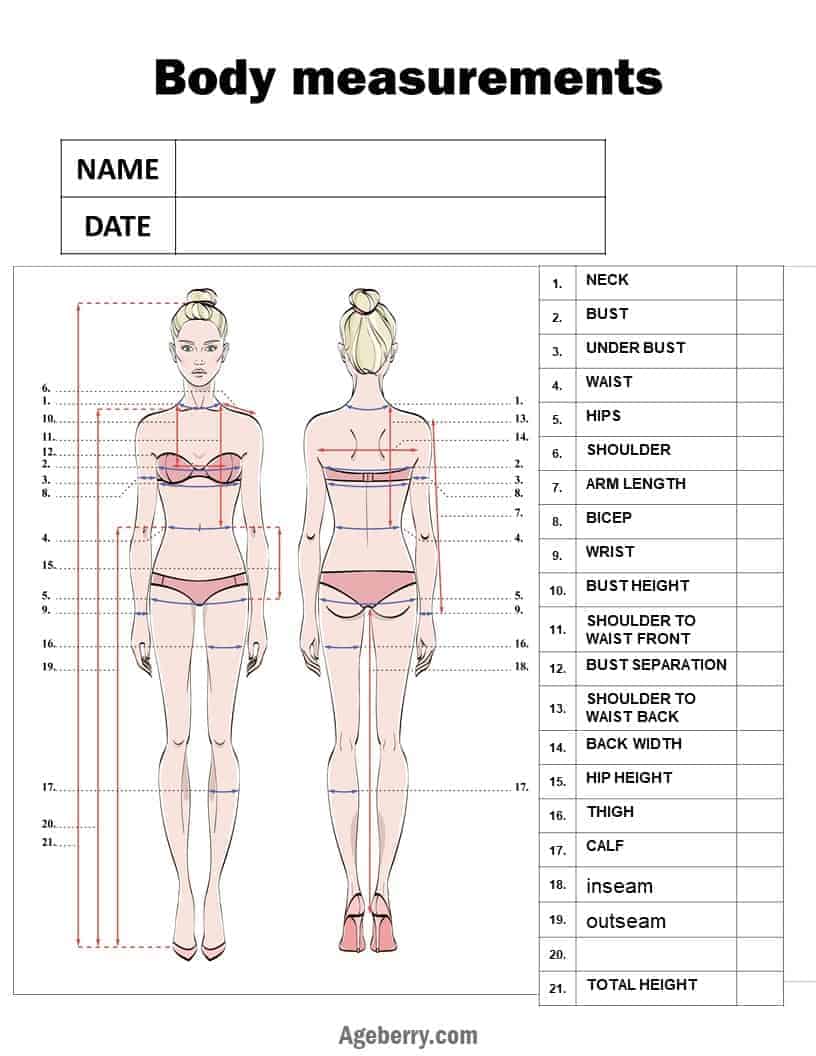
If you’re looking for a body measurement chart specifically for women, I’ve got a free PDF that you can download from my Resource Library. This chart includes all of the measurements you’ll need, including bust, waist, hips, etc. It’s easy to use – simply input your own measurements and start sewing.

General Tips For Taking Body Measurements
These tips will help make taking full body measurements for sewing easier and more accurate.
Remove All Thick Or Bulky Clothing
Loose, thick, and bulky clothes will cause your measurements to be inaccurate. If possible, wear only the underwear and bra that fits the best. If underwear-only is not an option, wear tight-fitting clothes like leggings, a tank top, or a thin, tight t-shirt.
Wear The Undergarments You’ll Use When You Wear The Item
Always wear underwear and a bra for measurements if the garment is designed to be worn with them because the body aligns differently without them. If you plan to wear a push-up bra with the garment, wear that for the measurements, or you may have unpleasant surprises later.
Relax Before Measuring
Stand in your normal position. Don’t try to force a position that’s more rigid or straight than you normally have. Avoid sucking in your belly and keep your feet straight at about 10-15cm apart (4-6”).
Don’t Pull The Tape Too Tight
Hold the measuring tape against your body, but not too tightly. When measuring the upper part of the body, breathe normally. If you don’t, the measurement will not be accurate.
NOTE: The tape should not make an indentation in any soft part of the body.
Only Write Down The Numbers As They Are
Don’t add anything to the numbers on the measuring tape.
Body measurements are the actual measurements of your body. They are not the measurements of the pattern. What you measure is what you get.
Further, I don’t think you should bother with small fractions of an inch. For example, if you see that the number is 26 ¼ inches, you should write down 26” or 26.5”. Or, if you see 39 15/16” (many measuring tapes have 16 parts of an inch), then write down 40”. I usually round up the number like this.
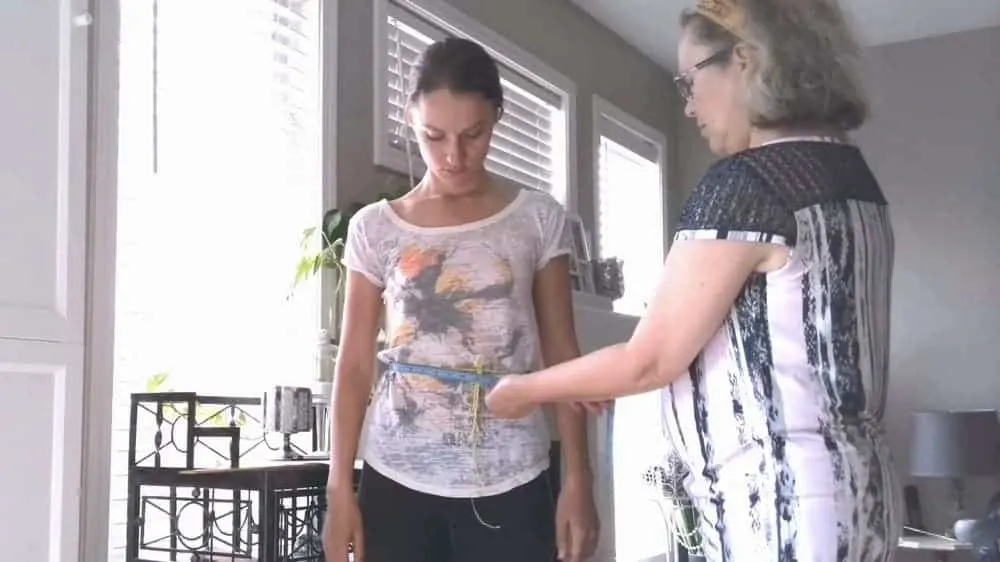
Have Someone Help You
This may not be possible, but having an experienced person help when getting proper body measurements for sewing clothes can be extremely helpful. If you can’t get help, you will need to supervise closely to ensure you’re doing it correctly.
Don’t Rush
There’s no need to be in a hurry. Take your time and do it right, or you’ll end up with garments that don’t fit, which is a waste of time and money.
Take Measurements Twice
It’s also good to take measurements both in the morning and in the evening. Although this may sound unnecessary, you will be surprised to find out that the measurements change slightly throughout the day (both length and width).
Offer Treats When Measuring Children
Yes, you read that right! I don’t remember where I read this, but it was funny. You need treats to make your children sit through the process. Yes, indeed!
My children are grown now, but I can attest this is 100% true! Until my girls were in their late teens, I had a very hard time making them stand still long enough to take body measurements for sewing clothes.
Of course, when they were in their late teens, there were other problems because none of the patterns I wanted to use were cool enough!
If you prefer to watch the tutorial on how to take body measurements, go to my YouTube Channel (or watch below!).

✅ Related tutorial: How big is a yard of fabric
What body measurements should you take?
The general consensus is that there are 3 basic measurements that you need: bust, waist, and hips.
Is this enough? In principle, yes. In reality, you might need extra measurements (specific for each pattern), depending on the pattern you use.
For example, if you want to draft your own pattern, you will have to take many more different measurements. We will deal with some of them a little later, but here is how to take basic body measurements.


How To Measure Bust
Measure around the fullest part of the bust. For women, this would be the absolute fullest part of the body. Don’t forget to wear a bra (see above).
Stand straight with arms hanging by sides in a relaxed and natural stance. Make sure the tape is straight and does not sag at the back. You will either need help or to look in the mirror for this. Also, make sure the tape is not pressing your breasts.
You want the measuring tape parallel to the floor for this measurement.
How To Measure Waist
In theory, the waist (above the hips) is the narrowest part of your upper body, and this was certainly true for me until now. It’s still true, barely!
It’s important to make a difference between the natural waist (which we measure now) and the waistline of your pants or jeans, which is probably much lower. The natural waist is usually above the level of the belly button.
Sometimes it may be difficult to find the natural waistline, especially after a certain age.
Here’s a tip: tie a ribbon, string, or elastic around the body (not very loose or very tight) where you guess the waist is. The ribbon will fall naturally into place after a couple of movements, and you can measure around it. Another method is to try bending at the waist towards the left or right – the point where your body flexes is the waistline.
Once you have determined the natural waist and have an elastic/ribbon around it, leave it in place until the end of the session because other measurements will be taken to or from the waistline. Many length measurements start (or end) at the waistline, so knowing exactly where it is, is absolutely critical.
If a waist can’t be clearly determined, simply measure the body at the level slightly above the belly button.
NOTE: Finding the natural waistline can be challenging for both older women and young children.

The Challenge Of Getting A Waistline Measurement
I can say that this is also the most difficult measurement because many women want to suck in their bellies! Try to stand upright and relaxed, but don’t lie to yourself. Take your real waistline if you want to breathe, eat, bend over and sit down in your skirt.
They usually say that you have to keep your measuring tape parallel to the floor, but sometimes it’s just not accurate. You may notice that your waistline is probably not at the same level in front and in the back.
For example, the front is sometimes lower than the back (check this in the mirror). And in other cases (if you have a bigger tummy), the front may be a little higher than the back. We are not models, so don’t worry if you see that your waistline is not parallel to the floor.
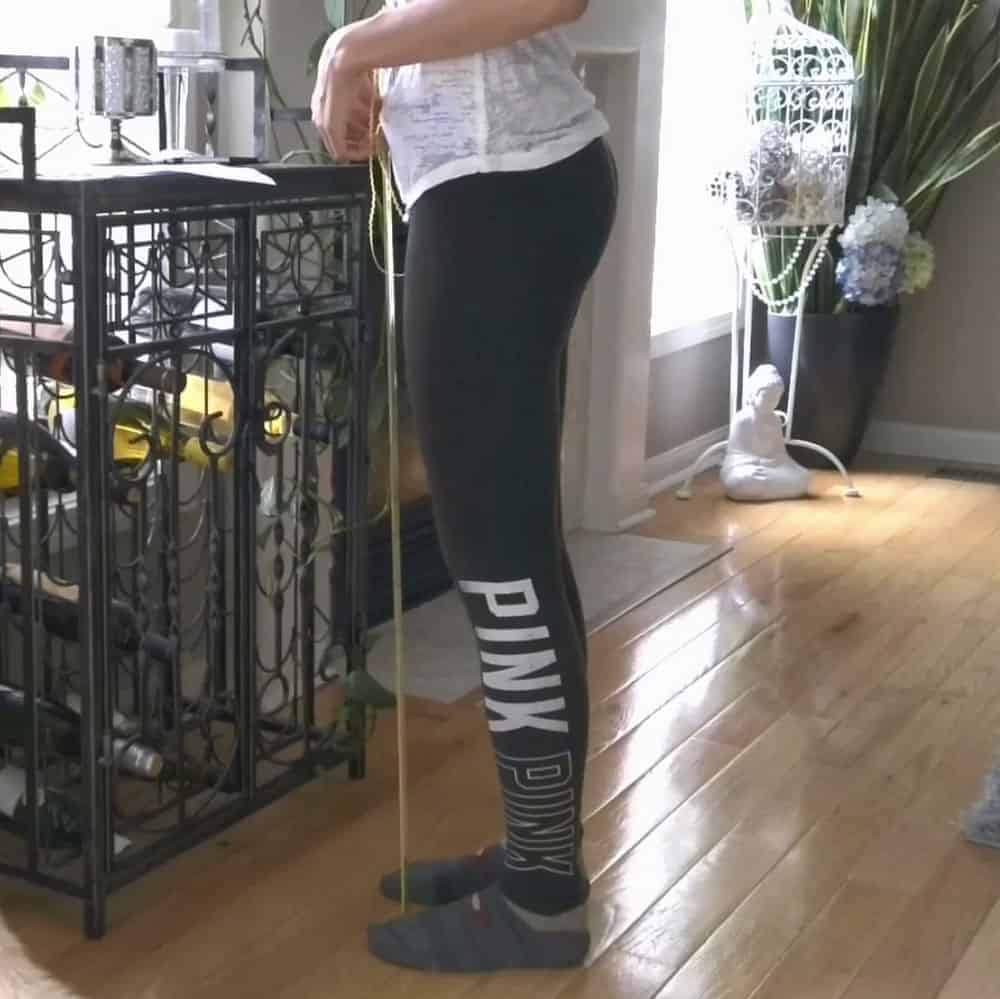
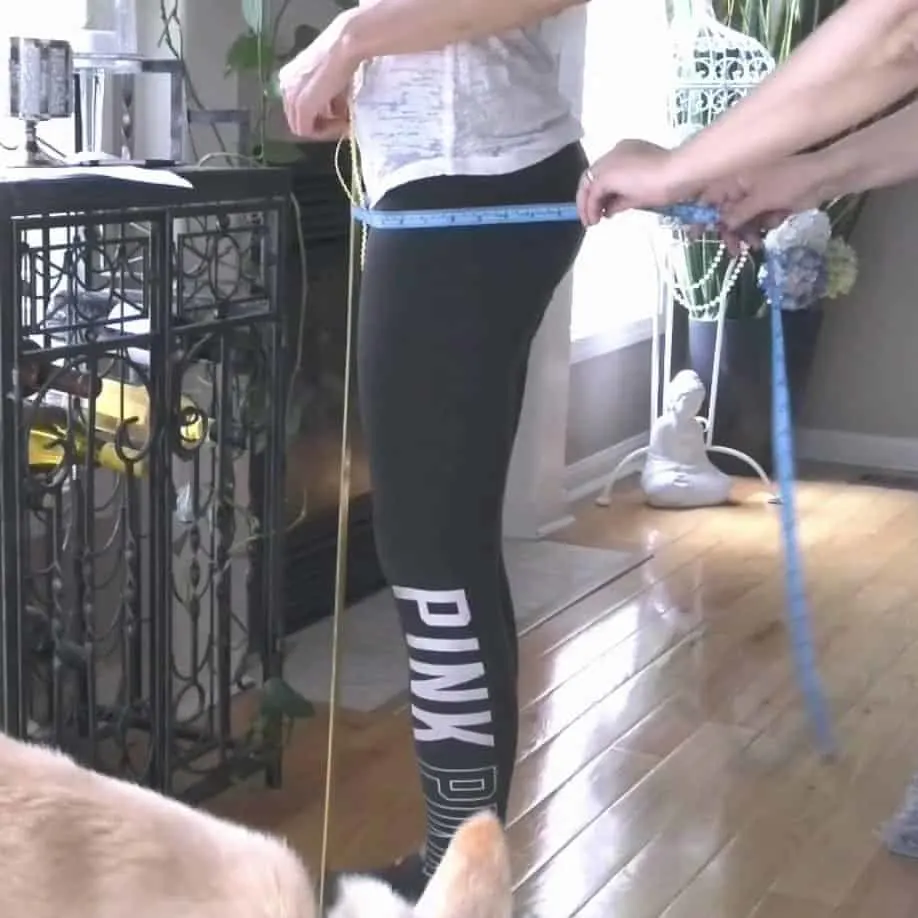
How To Measure Hips
The hip measurement is supposed to be the widest measurement around your bottom. You will have to determine the exact point for your body because it’s not the same for everyone.
Usually, it’s recommended to measure horizontally around the widest part of your hips. But again, it’s rare that the widest part of our bottoms aligns parallel with the floor. Your stomach can protrude in a different place than your buttocks. With that in mind, we can measure like this in the drawings below.

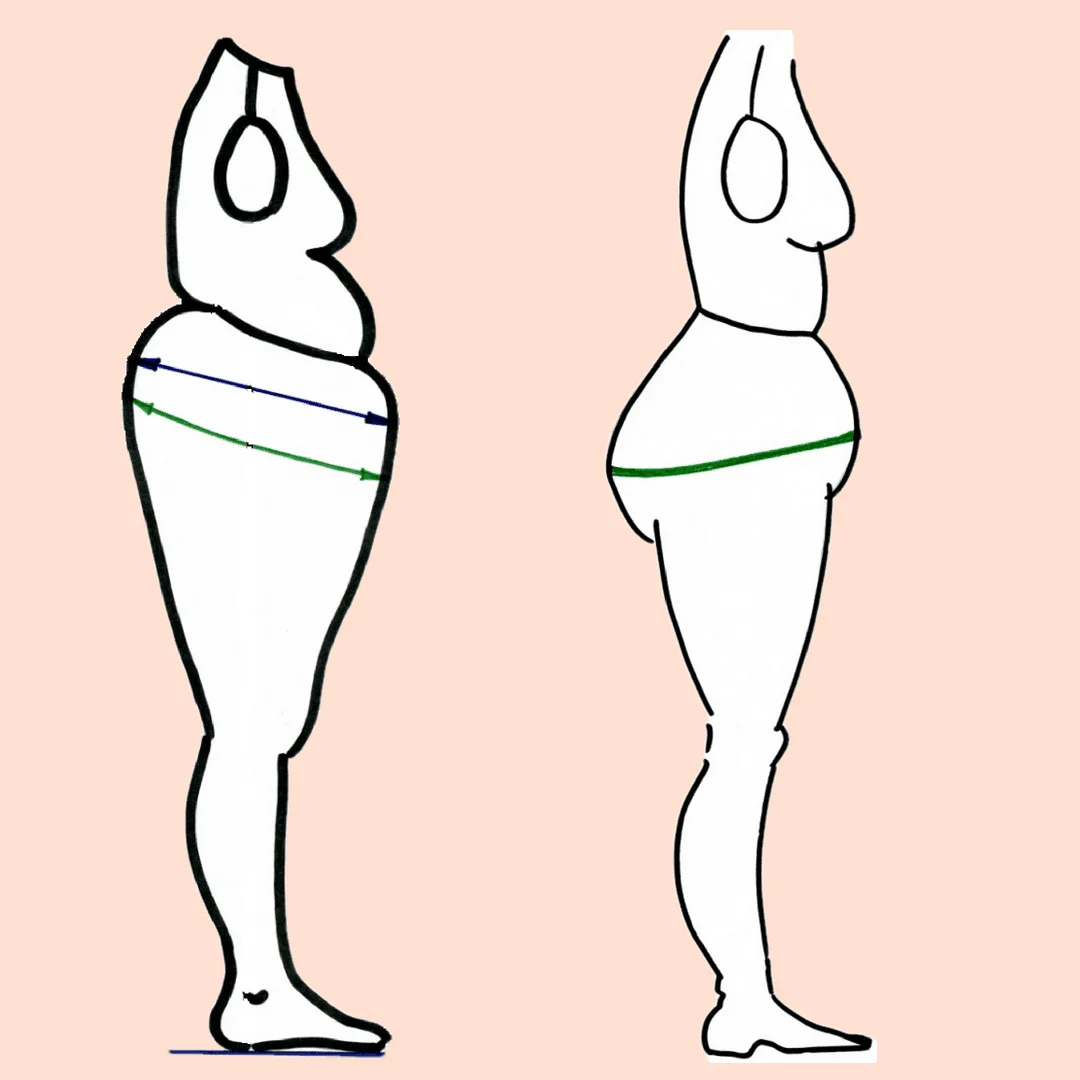
But there is another, more accurate method.
Take a rectangular, rigid piece of paper and wrap it over your bottom. Connect the edges with scotch tape and make sure the edges go exactly vertical and parallel to each other. After that, measuring your hips is much easier because you just measure around the paper.

Finally, you can use a long ruler. Put it at the level of your belly perpendicular to the floor. Then measure around your buttocks and around the ruler at the front, keeping the measuring tape parallel to the floor in this case.
However, I find the paper wrap method to be easier and faster.


Apex Height Measurement
The apex height measurement is from the shoulder seam down to the bust point.
Make sure to wear the bra you plan to wear while taking this measurement because some bras (ex: push-up bras) will raise the bust apex and alter this measurement.
Other Useful Body Measurements
Once you feel comfortable measuring your bust, waist, and hips, there are other useful measurements you could take (and might need). Some of these are specific to particular garments, such as trousers, so you won’t necessarily use them all for every project.
Neck
This is the measurement around your neck. It has to be measured above the collar bones, but not very high. It’s useful for drawing necklines.
Height
Take off any shoes and get your subject to simply stand up against a wall. Measure from the floor to the top of the head. If you are measuring yourself, use a ruler and place it above your head, touching the wall. Spin around and then measure where it touches.
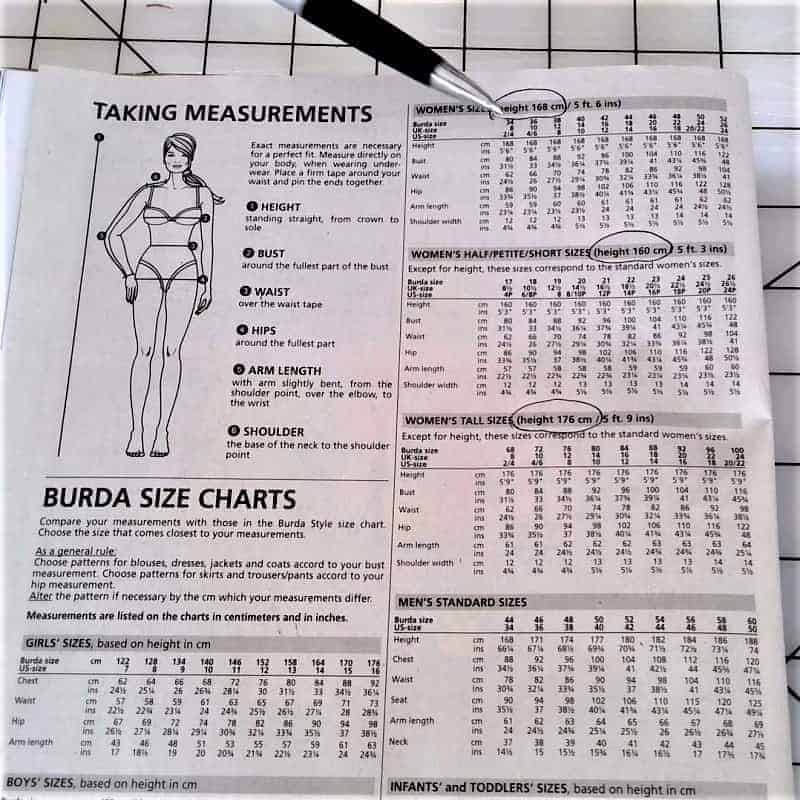
A lot of patterns don’t specify height. But if yours does, it can be a good comparison to judge whether you want to alter the length. I like to use Burda patterns, and the height measurement is always necessary to choose the right size.

Another consideration when looking at envelope covers is that models are taller than the average person. If a dress or skirt hits the model at the knee, then it will probably be below the knee or look a couple of inches longer for most people.
Shoulder
The shoulder measurement is (no surprise here) the length of your shoulder from the point where the shoulder joins the neck (it’s actually the highest point of the shoulder) to the outside edge.
It’s a very important measurement for drafting a bodice pattern.
The arm is not straight where it joins the shoulder, so you have to be careful not to go down the arm. Feel your way around the edge of the shoulder until you find the end of the bone. You will also use this point for the next measurement.
Arm
You need to know this measurement if you make clothes with sleeves. It’s useful for sizing and placing sleeves and cuffs.
Measure from the edge of the shoulder (see above) to the wrist. Do NOT measure this length with your arm straight. Instead, you should bend the arm and then measure because the bend around the elbow will increase the length a little bit. This is where help would be welcome!
Bicep
Measure around your bicep above the elbow.
Wrist
Measure around your wrist above your hand where the sleeve would end. You need to know this to properly adjust the cuffs.
NOTE: If you wear a watch or jewelry, you need to take this into account, or you may end up with sleeves that are too narrow to accommodate them.
Shoulder To Waist – Front
Measure from the same starting point on your neck as you measured the shoulder length. The measurement goes on top of the breast, usually straight above your nipple to your waist (which is marked with the ribbon).
NOTE: Be careful not to apply force to the tape. I use this measurement to adjust the bodice size. For me, this is always shorter than I see in commercial patterns.
Shoulder To Waist – Back
Measured from the same starting point on your neck as you measured the shoulder length. The measurement goes to your waist. If you need to make adjustments to the front of the bodice, you will surely need to adjust the back also.
Under Bust
This is the measurement around your body that is taken below your bust. Keep the measuring tape parallel to the floor and measure just under your breasts. If you have a larger or smaller bust, this might be useful for doing full or small bust adjustments to bodices.
Bust Separation (also called Bust Apex To Bust Apex)
Measure the distance between both apexes of the bust. This is an important number because darts should point to the bust apexes.
Bust Height
The bust height is measured from the shoulder at the base of the neck vertically to the bust apex.
Back Width
This is an important measurement for drafting your own patterns and for fitting adjustments.
Find the point on the back where the arm seems to attach to the back. Measure across the back from one side to the other.
Hip Height
Measure along the side of the hip, from the waist to the hips. This measurement can vary significantly from person to person.
Hollow To Hem Measurement
What is hollow to hem? It’s a dress-specific measurement. Take it from the hollow at the base of the neck front (the dip between the collarbones) down to the hem of the skirt.
Hollow to hem measurement needs to be taken wearing the same heel height you want to wear with your dress. It’s also important to be looking straight ahead, or it will impact the measurement.
How To Measure Hollow To Floor
What is hollow to floor? This measurement goes from the hollow at the front of the neck base (the dip between the collar bones) down to the floor.
You’ll need help with this measurement (you hold the end of the tape measure at the hollow while someone else takes it down to the floor). It is recommended that you stand straight, look forward, and don’t wear shoes when taking a hollow-to-floor measurement.
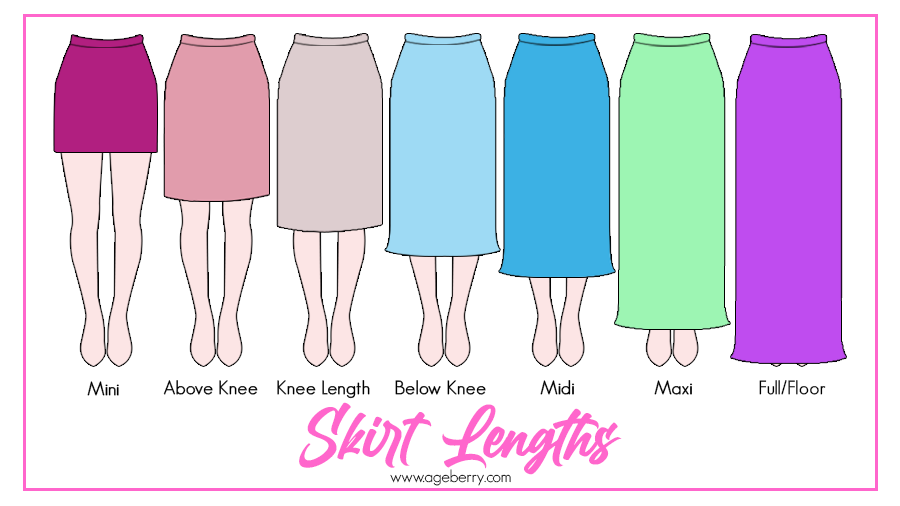
How To Measure Dress Length
Because people come in all shapes and heights, you need to know how to take accurate body measurements for sewing dress length to get a proper dress fit. In addition, dresses come in a large variety of lengths from mini all the way down to floor-length, making this measurement even more important.
To measure dress length, start at the shoulder near the side of your neck and measure down to the desired length for the dress:
- Mini – stop measuring at mid-thigh
- Above the knee – stop measuring a few inches above the knee
- Knee – stop measuring at the top of the knee
- Below knee – stop measuring a couple of inches below the knee
- Midi – stop measuring at the middle of your calf
- Maxi – stop measuring at your ankle
- Floor length – stop measuring at your toes
This dress length measurement chart gives a nice visual of the different dress lengths to complement the descriptions above.
Inseam (Inside leg)
This measurement is for pants only. As a general rule, measure from your crotch to your ankle (or to the floor). This will give the inside length of your pants leg.
NOTE: Depending on the kind of heels you will wear and the width of the pants, the inseam might be longer or shorter for the pants to drape well. I found that leaving a wider hem allowance (at least 1” if not more on top of the normal allowance) allows me to adjust this in the final fitting stage.
Outseam (Waist To Ankle)
This is the outside counterpart of the inseam. Measure it from your natural waist to the ankle (or to the floor). Beware that, unlike the inseam (inseam gives the exact length for pants), the pants outside leg may be shorter than this measurement taken from the waist.
The pants will not usually raise to the waistline. The outseam is also useful for maxi dresses or skirts, following the same inseam recommendation of a longer hem allowance. Of course, if making pants, you will certainly use the same allowance as for the inseam.
How To Measure Yourself For A Dress
If you want to make a dress for yourself, you’ll need to know how to take your own measurements. It’s easier if you can get someone to help you, but you can do it yourself with a little know-how.
After you know your own measurements, measure the dress fabric when it’s lying flat on a clean table or floor because the fabric can stretch when it hangs.
Here are the measurements you’ll need in order to make a proper-fitting dress:
- Dress length
- Bust
- Waist
- Hips
How To Use A Measuring Tape For Body
When you need to get measurements to make garments, here’s how to measure your body with measuring tape.
- Stand straight but relaxed. Try not to pull in your tummy.
- Wear the appropriate clothing (underwear, bras, avoiding bulky or very loose items).
- Make sure the measuring tape is as flat as possible and avoid pulling it too tight.
- Write down your measurements as you take them, so you don’t confuse or forget numbers.
Now you are ready to determine your pattern size by taking body measurements!
Whether you’re looking to create a one-of-a-kind garment from your own pattern or want to make sure an off-the-rack pattern will fit like a dream, be sure to grab my free printable body measurement chart for sewing PDF before you get started. Trust me – a sewing measurements chart comes in handy again and again as you sew your way to a perfectly fitting wardrobe.
Did you find this tutorial helpful? If so, save this pin (see below) on your sewing board so you can come to this tutorial later when you are ready to take body measurements for sewing projects, and follow me on Pinterest for more tips, tutorials, and inspiration!

latest posts
- Think You Know Zippers? This Installation Guide Might Surprise You
- Why Does Your Seam Ripper Have a Red Ball? Discover Its Purpose!
- Topstitching Troubles? This Simple Trick Will Turn It Around Instantly!
- How to Sew Shirring: A Step-by-Step Guide to Elastic Thread Gathering
- Are Self-Threading Needles Really Useful?
- Amazon Spring Sale: Best Choices
- Elevate Your Prom Look: A Guide to 10 Neckline Choices (2024)
- No Pattern, No Problem: Turn Scraps into a Quilting Masterpiece
- Prom Perfection: A Guide to Choosing the Perfect Dress Color (2024)
