
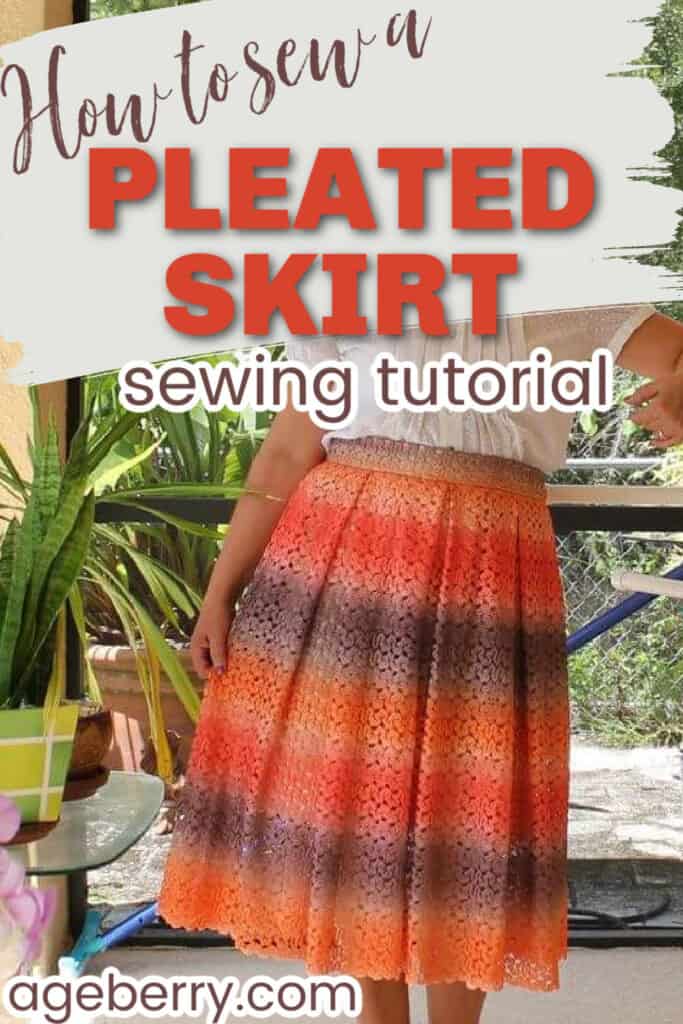
In this sewing tutorial, I will show you how to sew a box pleated skirt.
You don’t need to make a paper pattern, we will draw pleats directly on the fabric.
The box pleated skirt can perfectly complement diverse styles, and work for different occasions. You can make one for crisp office wear or casual Fridays. You can make it from popular floral or African prints or stick to solid colors. You can make it from cheap cotton for everyday wear or from expensive silk for special occasions.
The options are really as diverse as women themselves. I am sure you won’t regret having one of these skirts in your closet.


Note: Some of the links on this page are affiliate links. This means I will receive a commission if you order a product through one of my links. I only recommend products I believe in and use myself. ?
Of course, you can buy a pleated skirt on Amazon really cheaply. The skirts look so nice in the photos.
Note: Some of the links on this page are affiliate links. This means I will receive a commission if you order a product through one of my links. I only recommend products I believe in and use myself.


")
But read what people are saying after they buy those skirts.
“It’s very cheap material. Like, thrift-store-Halloween-costume cheap. I was very disappointed and returned it without even trying it on.”
“…the picture shows it below the knee. It goes above my knee and I’m not a tall woman. The material is scratchy and hard. The skirt does not flow. It seems like they skimped on fabric when they made it.”
“Looks like a parachute was tied around my waist. Plus the buttonhole isn’t properly sewn, making getting the skirt on and off is a pain.”
“The black is HORRIBLE material. Reminds me of a horrible plastic costume or french maid outfit. The design is great but the fabric is allll wrong.”
“It was such a disappointment. The color was nice but if you have hips or a large derrière it makes you look about 50lbs heavier”
“The fabric is really quite a cheap feeling and it doesn’t quite fit the waist all too well. Very awkward bottom hemline…”
“Poorly made, runs small, and the stitching was incredibly uneven……ended up returning it”
“Arrived with unsewn seams and rips. Went right in the trash.”
“Very poorly made, cheap fabric, don’t waste your money!”
“Very poorly made. Cheap fabric. Overall, horrible.”
And all these complaints go on and on and on.
Of course, you can avoid all these problems if you buy $300 dollars and an upskirt. But I know a better way – sew the skirt yourself. And then you can make it from the fabric of your choice and in the size you need.
This style of skirt is easy to make even for beginners, but depending on the fabric and number of pleats, it may not complement every figure. For example, one of my friends made the skirt and said that when she put it on, the skirt looked like a lampshade.
So, if your fabric doesn’t drape well and the pleats don’t form soft folds, if you’re self-conscious of your waist, or if there are too many pleats and you end up with too much bulk around the waist – this box pleated skirt will probably not be a fit for you.
So, choose whatever works for you and flatters your body type. Unfortunately, this is a path you must travel alone.
I can only give some advice. For example, choose the proper fabric for your box pleated skirt – it shouldn’t be heavy. Lightweight 100%cotton is the best (in my opinion), but some types of silk and wool fabric work as well.
Also, choose the proper length of the skirt. Box pleated skirts look good usually if they are longer than the upper part of your body (from the waist up), the usual length is a knee-length or below the knee.
If you would like to know more about how to wear a pleated skirt I suggest this article.
What is a box pleat?
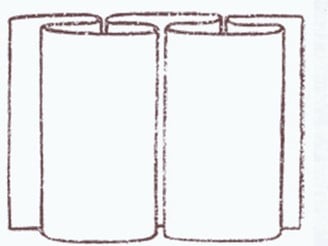
If you wonder what are box pleats, they are simply pleats made by folding the material left and right in such a way that the folds meet in the middle. They are usually a part of the skirt design. But they can be found also on home decor items (such as curtains and bed skirts for example).
Soft pleats as opposed to pressed pleats? Nothing simpler! For soft pleats, the material is folded at the waist (at one end) but the creases are not pressed all the way down, allowing the fabric to fall in folds. For the pressed pleats, as the name says, the material is pressed all the way and the crease is permanent (or we certainly would hope so).
Best fabric for a pleated skirt
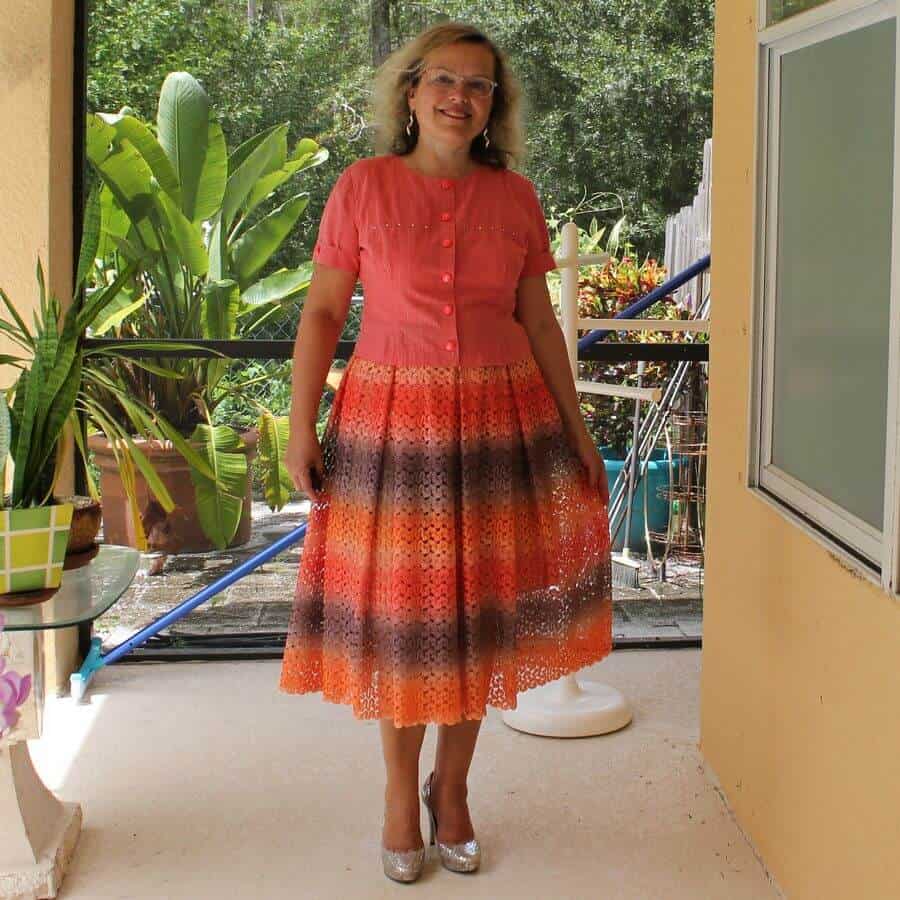
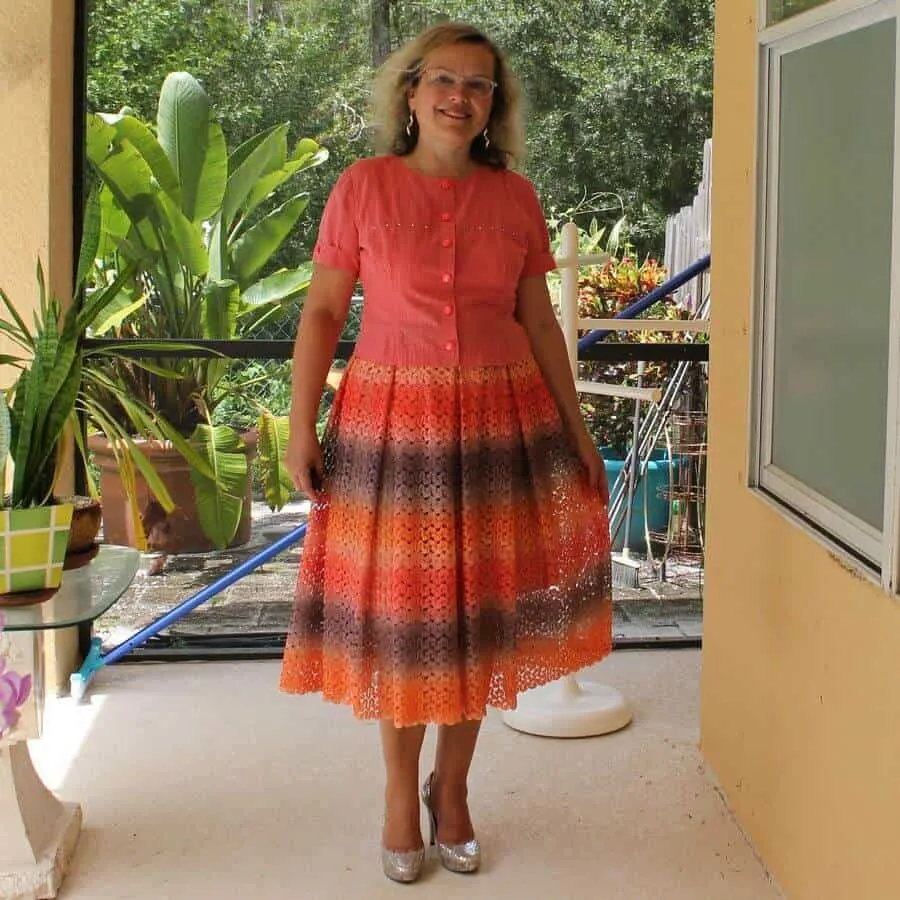
I have decided to make a midi skirt with 8 soft box pleats, fastened with an invisible zipper at the side.
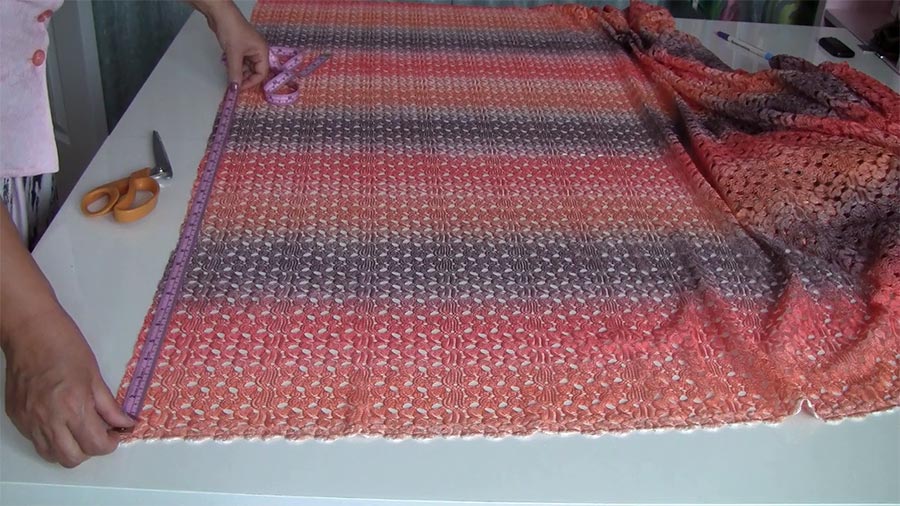
The fabric I chose for the skirt is a lightweight, ethereal lace with a tropical sunset color palette. The colors are bright and festive, arranged in rows that bleed evenly from one hue to the next. The material flaunts a delicately woven pattern throughout. And I am going to make a lining for my skirt from silk shantung.
But you don’t have to choose lace fabrics. Make the skirt from any lightweight woven fabric: cotton, silk, wool. Don’t use fabric that doesn’t drape well. I would not recommend using linen for example. Also, I would avoid any knit fabric.
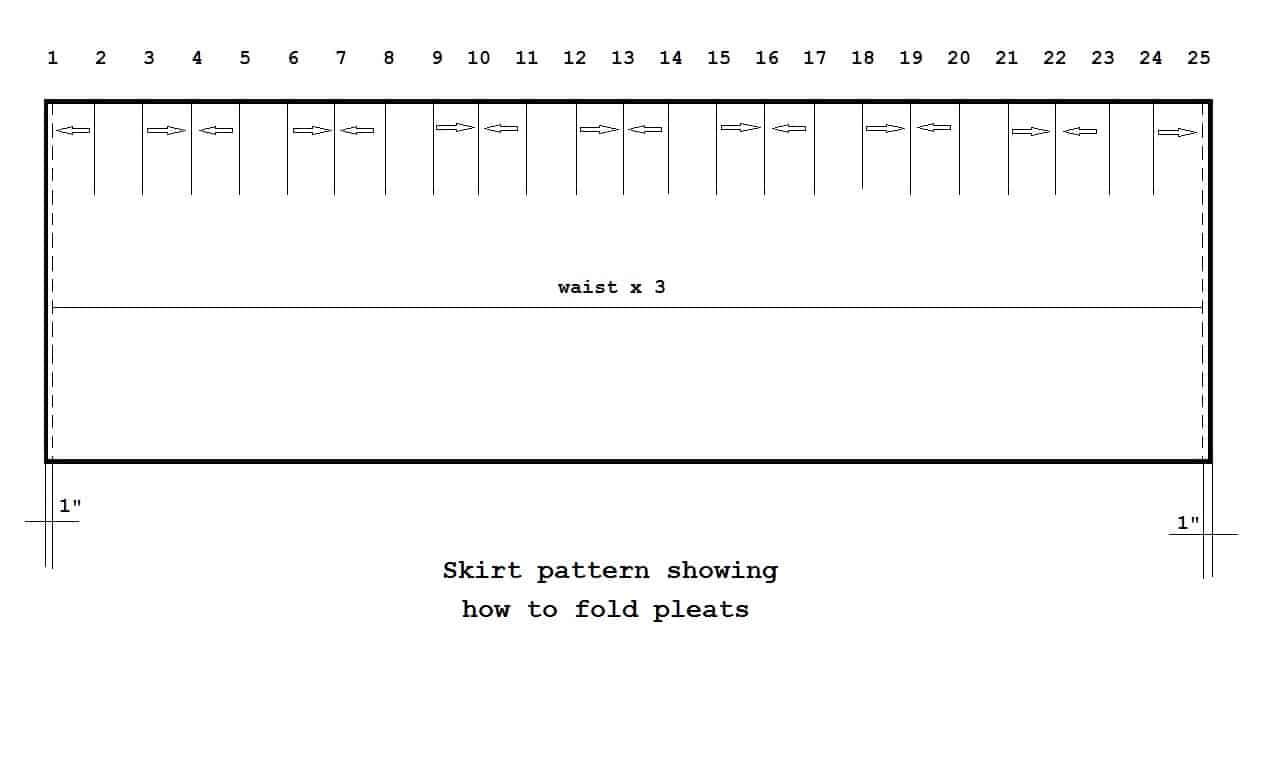
How to measure for box pleats
I have seen a video tutorial that claims no math is needed. I would rather say that the math needed is extremely simple and involves only elementary operations. But to me, it’s obvious that if I have a 30-inch waist and I need 8 equal pleats, the pleat size will be slightly different than for a 28-inch waist. Not much, but enough to be visible to the naked eye.
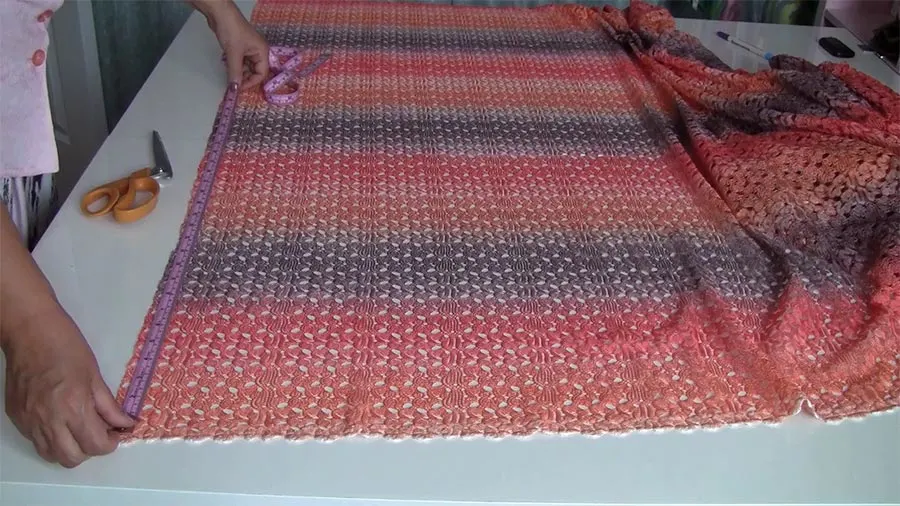
We need the following measurements
- Waist
- Skirt length
- The number of pleats. The most common number is 8, but depending on the waist size and the material, you may decide to use 6 or 10, even 12. The larger number is for thinner materials and/or larger waist sizes.
The width of a pleat will be equal to the distance between the pleats and will be calculated like this:
waist divided by the number of pleats.
As an example: in my case, the waist is 36 inches, and for 8 pleats this gives me the pleat width (and the distance between the pleats) of 4 1/2 inches.
✅ Related tutorial: Fabric conversion calculator
Of course, it’s completely possible to make a box pleated skirt with the distance between the pleats not equal to the width of the pleat. But then it will be more difficult to measure for box pleats and we want it to be as simple as possible, right?
Another very important point is that the grain line of the material should be parallel to the waistline — which is unusual, but unless they start making materials 100 inches wide, we have no choice. The pleated skirt will require a very wide piece of fabric: for my waist measurement of 36″ this will be 3 yards.
So, you will need the following length of your material: 3 x your waist measurement, plus 2 inches for seam allowances.
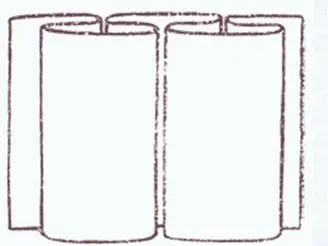
Pleated skirt pattern
We don’t really need the pattern since we will draw the pleats right on the fabric, but this shows the direction in which we will fold the pleats.

Attention! If you like the video format, at the bottom of this post, look for a YouTube video version where there is a step-by-step tutorial on how to sew a pleated skirt. For a more complete picture, I recommend exploring both versions.
Box pleated skirt tutorial step-by-step
Step 1.
Prepare necessary tools and notions. We will need fabric, a ruler, measuring tape, marking tools, an invisible zipper, thread, and needles suitable for your fabric. I use Wonder tape – double-sided adhesive tape to make the pleats.
Step 2.
Place the fabric right side up and cut straight one of the edges from where we will start measuring pleats. Fabric cut in the store is usually not straight. Make sure that the fabric edge is exactly perpendicular to the grain line. If you have questions, I suggest my tutorial “How to cut fabric perfectly straight.”
My lace fabric has some pattern lines which I can use for cutting it straight.
Step 3.
Mark the desired length of the skirt. If you make the skirt from fabric with selvage (as most fabrics are), cut away the selvage and measure from the selvage end the length of the skirt, including the seam (⅝ in for the waist) and hem allowances (2 ¼ or 2 ½ in). Draw a line parallel to the selvage at that distance and cut.
But my lace fabric doesn’t have the regular selvage; the edges of the lace are scalloped and I am not going to cut them. Instead, I am going to use this scalloped edge as a hem for my skirt.
Step 4.
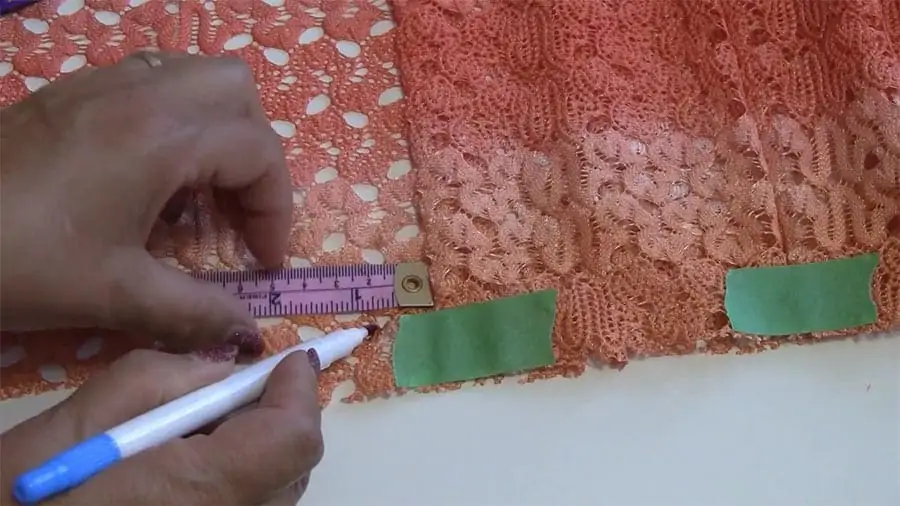
Make a template for your pleats. You can use a regular ruler, but I like to make an easy template from a piece of carton. We will need to measure this distance 25 times, so why not make it as fast as possible?

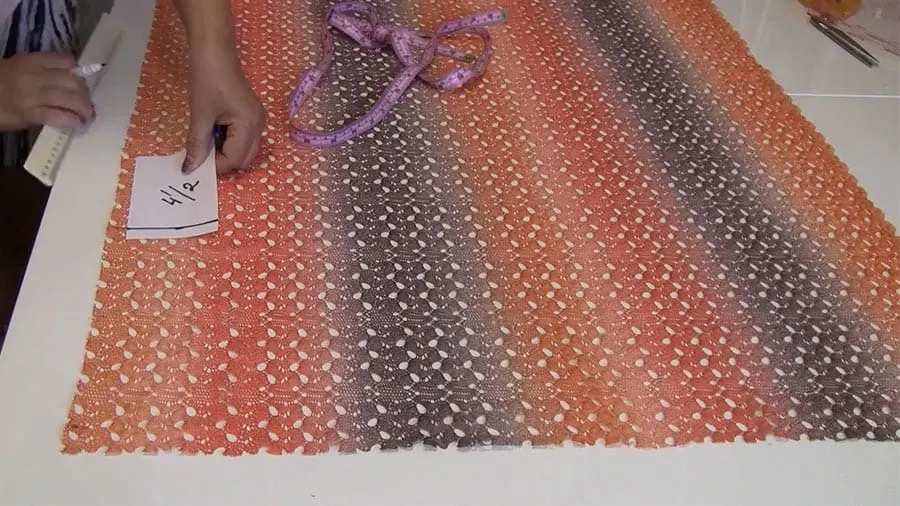
Step 5.
Mark the initial seam allowance (in my case I decided to make it 1 in) and then mark the pleats on the fabric using your template. After the last pleat, mark the seam allowance of 1 inch on the other side.
It is very important to precisely mark the fold and placement lines for the pleats. Since we will be working on the right side of the fabric, it is equally important to test the marking tools on your selected fabric to make sure they are appropriate and can be removed after sewing.
Step 6.
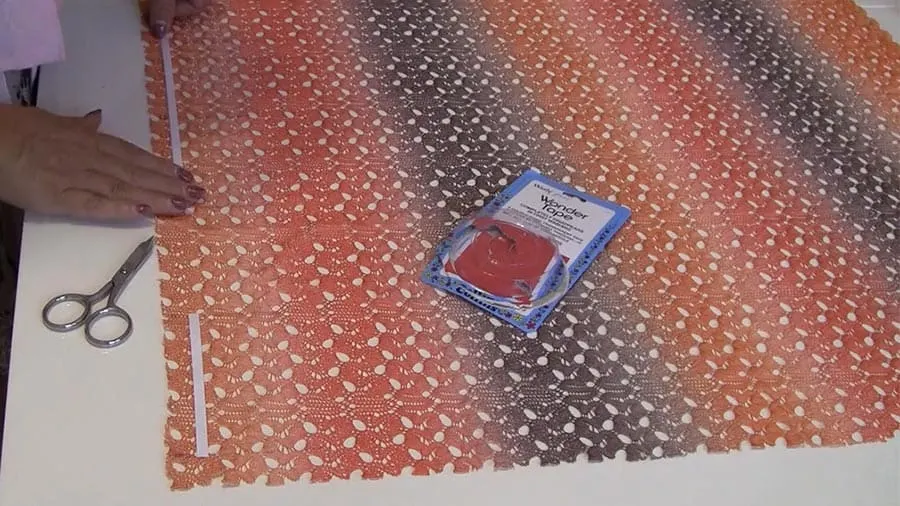
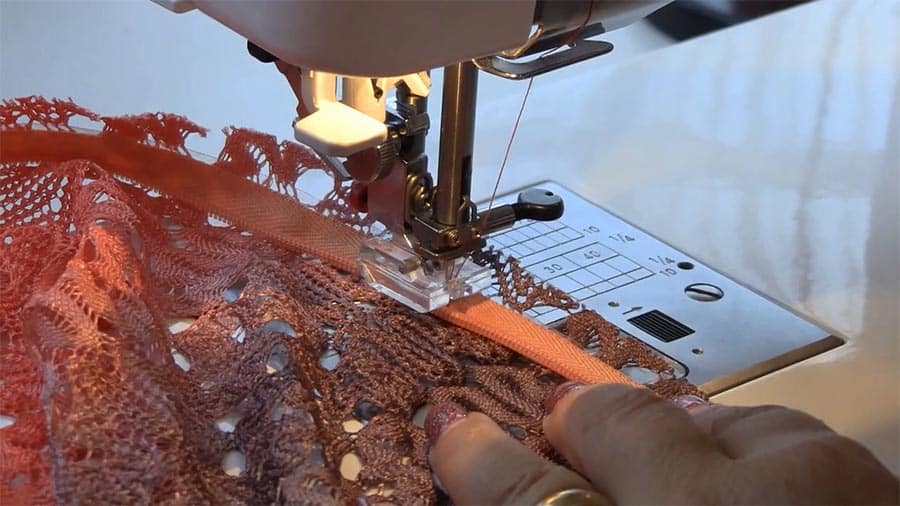
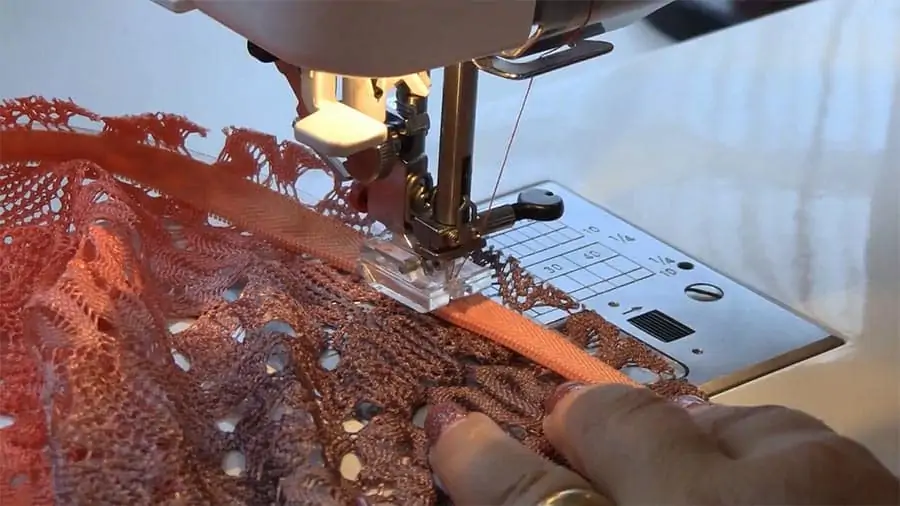
Place a double-sided adhesive tape (Wonder tape) from line 1 to line 2. Skip the distance from 2 to 3 (this is the inter-pleat distance). Place another piece of tape from lines 3 to 5. Repeat the process until line 25. This wonderful tape will magically hold the pleats in place without pins. Below you can see also a drawing on how to place the tape.

Step 7.
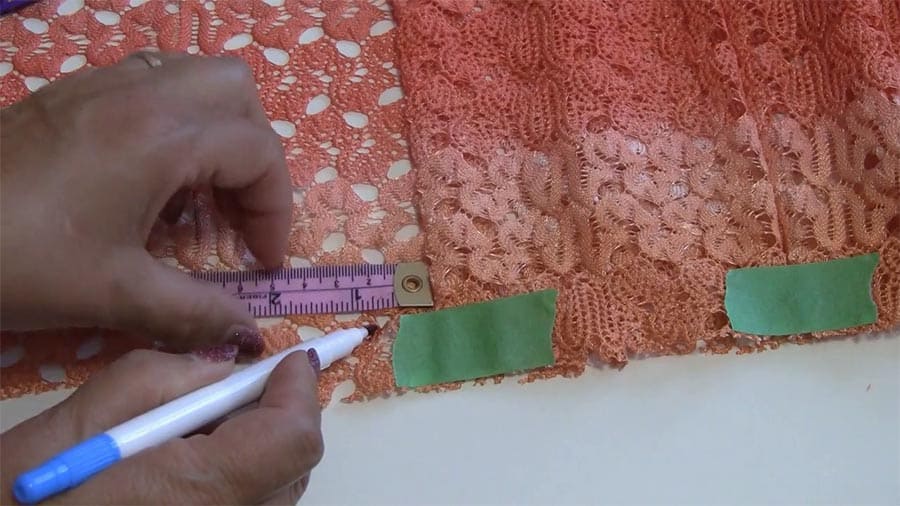
Start with a half pleat at the side seam line. This will allow the pleats to center perfectly at the side and will completely hide the seam. Begin with the second line that you marked and fold the fabric over by bringing it towards the first line.
The next step is folding the third marked line towards the fourth line. Repeat this process until the other edge of the fabric. Take the marked line #24 and fold it toward line #25. This will be the last half pleat.
When you finish the side seam, this pleat will meet the first one you made and the side seam will be hidden.
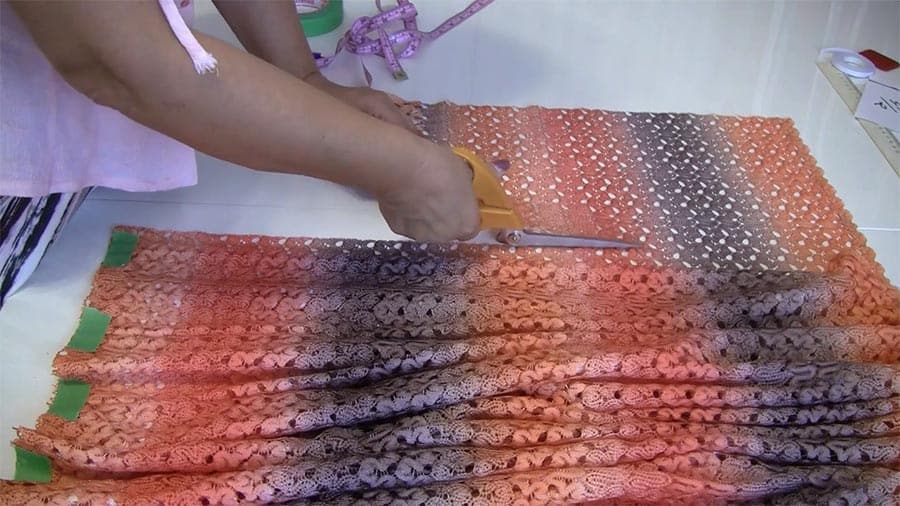
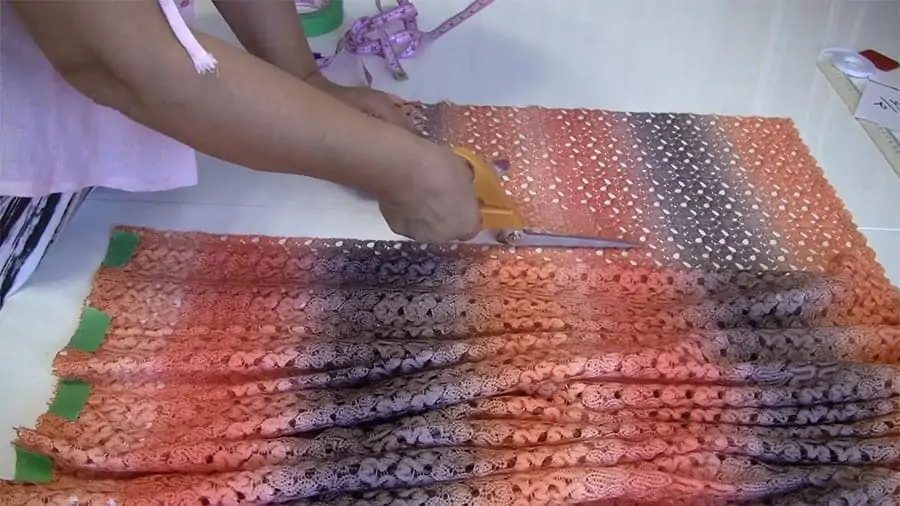
Step 8.
Secure the folds of the pleats together so that they don’t shift. I use painter’s tape for this.
Make a straight stitch along the edges of the green tape, holding all the pleats together. Don’t stitch over the painter’s tape – it will gum up your needle.
Step 9.
Measure one inch from the fold of the final pleat (line 25), for seam allowances. Cut along the line. I have lace fabric that doesn’t fray at all so I can leave seam allowances unfinished but you may need to finish the raw edges of your fabric at this point.
Step 10.
Now we need to insert an invisible zipper. I have a step-by-step video tutorial on how to sew an invisible zipper – check it out, here is the link.
I use Wonder tape for the zipper’s placement also – no pinning or basting required. I will show you the process in the YouTube video also but it will be not that detailed.
Start by placing the Wonder tape on the seam allowances.
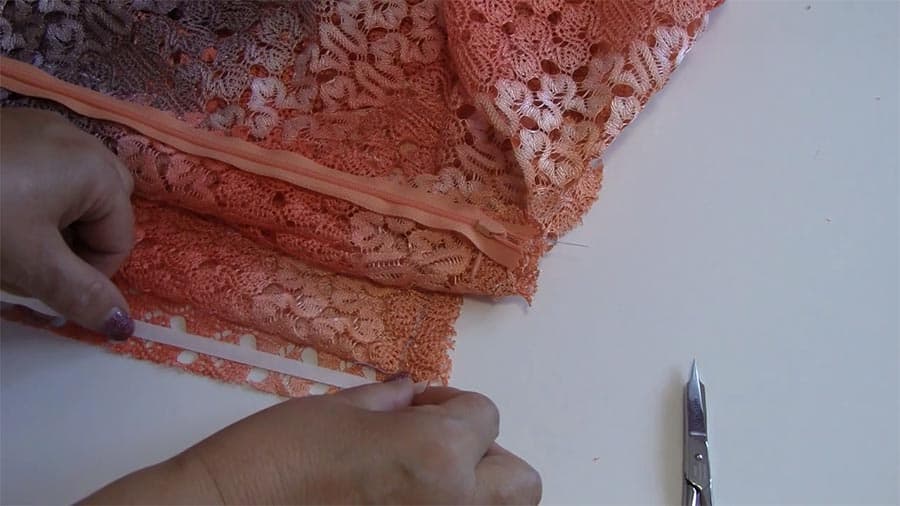

Continue with the zipper.
Close the zipper and attach its remaining side to the tape. Afterward, unzip the zipper again.
Stitch zipper using an invisible zipper presser foot.
Close the zipper, and behold! It becomes invisible. The first half pleat and the last half pleat must meet exactly over the zipper.
Step 11.
Using Wonder tape, secure the seams under the zipper for sewing. Stitch together the taped seams under the zipper. You can use regular pins to hold the fabric together for stitching, of course.
Step 12.
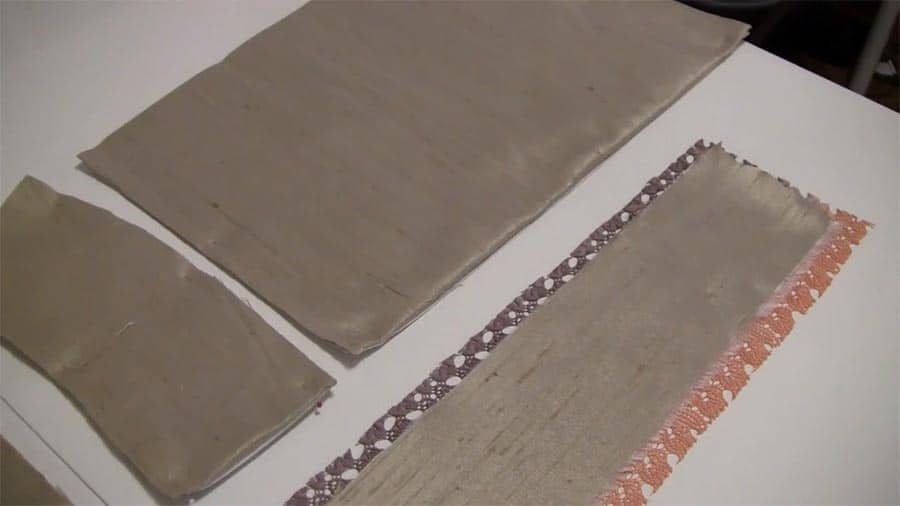
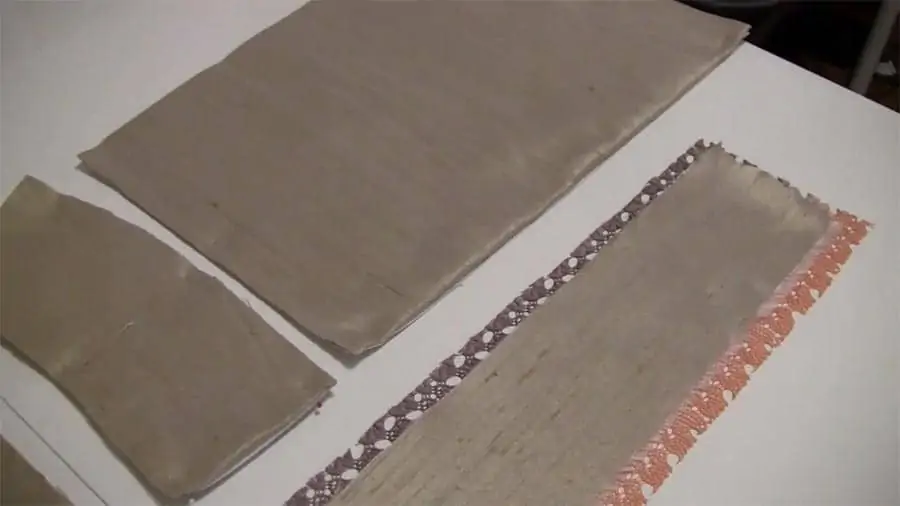
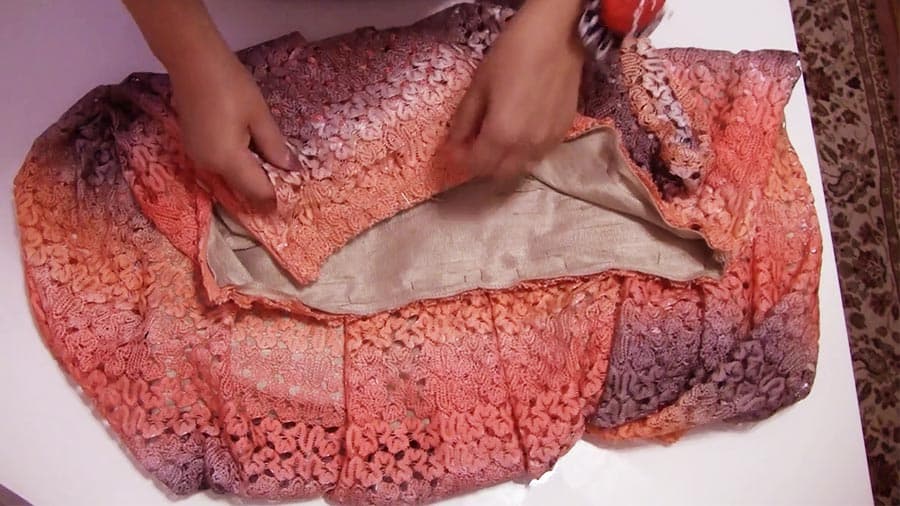
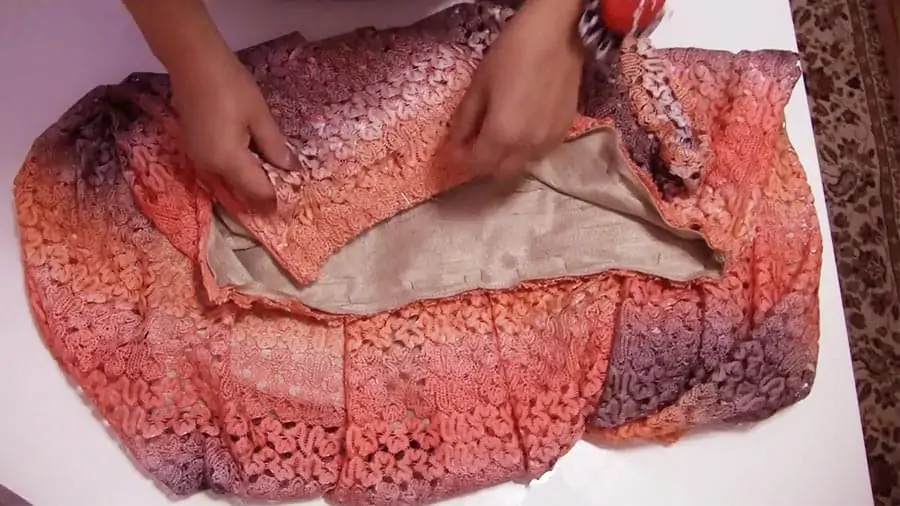
I am going to line the skirt with silk shantung fabric. It looks like dupioni but it’s softer and thinner so it will be suitable for the lining. I really need to put lining because my lace fabric has pretty big holes that you can see through.
You don’t need to put the lining for your skirt if you chose a different fabric from mine.
Cut pattern pieces for the lining. I am going to use a pencil skirt pattern I drafted myself many years ago. I like this pattern and use it pretty often.
Also cut a waistband from lace and from silk.
The length of your waistband is equal to your waist measurement plus 2 inches.
You can make it as wide or as narrow as you want. The width of the piece you have to cut is twice the desired width of the waistband plus 1 ¼ in for seam allowances.
Step 13.
Silk shantung fabric frays a lot, so before stitching the pieces together I finished all raw edges with a serger.
Step 14.
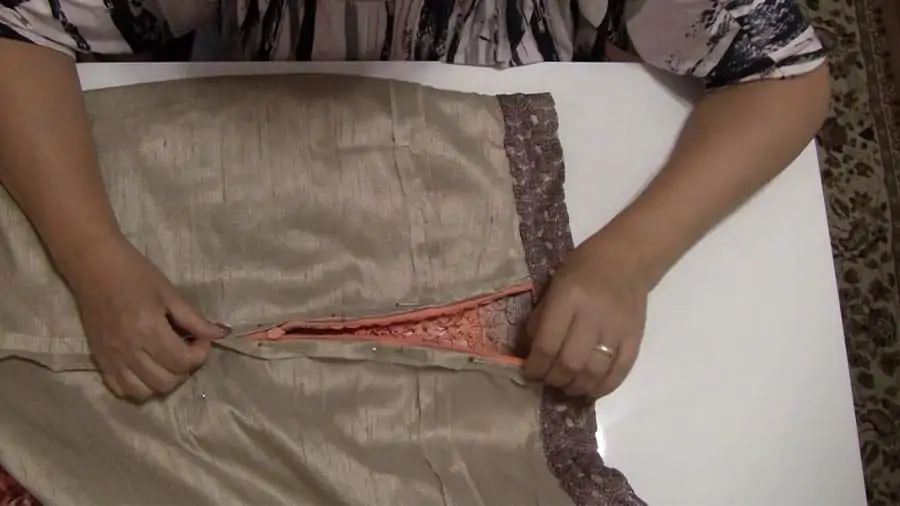
After you stitched the lining, place it inside the lace skirt. Note: one edge of the lining must not be sewn together. This must align with the zipper side of the skirt.
Pin the lining and skirt together at the waist, starting with the side seam of the lining. Mark the center back and center front of the lining, and pin them in turn to the middle of the skirt box pleat at the front and back.
Step 15.
Pin and stitch the waistband pieces (from lace and from silk).
I’ve stitched both ends of the waistband. Now, turn it with the lace right side up. To finish the waistband, I topstitch on its lower edge.
Step 16.
Sew the edges of the lining to the zipper edges, by hand.

Step 17.
Sew the snaps at the waistband, by hand
This is the result. The skirt is quite versatile, pairing nicely with a variety of neutrals and colors.
So here is my YouTube video. Check this out if you like to see how to sew a pleated skirt instead of reading…

Did you like this tutorial? If you want to save it for future reference and to use it later when you are ready to sew the skirt, pin this image to your sewing board on Pinterest and follow me on Pinterest for more tips, tutorials, and inspiration.

Ready to take the next step in your sewing journey? Check out more step-by-step tutorials from my blog.


latest posts
- Think You Know Zippers? This Installation Guide Might Surprise You
- Why Does Your Seam Ripper Have a Red Ball? Discover Its Purpose!
- Topstitching Troubles? This Simple Trick Will Turn It Around Instantly!
- How to Sew Shirring: A Step-by-Step Guide to Elastic Thread Gathering
- Are Self-Threading Needles Really Useful?
- Amazon Spring Sale: Best Choices
- Elevate Your Prom Look: A Guide to 10 Neckline Choices (2024)
- No Pattern, No Problem: Turn Scraps into a Quilting Masterpiece
- Prom Perfection: A Guide to Choosing the Perfect Dress Color (2024)
Terry Dec
Monday 20th of June 2022
Hi Olga,
This pleated skirt is beautiful, with all this combination of colors, just wonderful.
Thanks a lot for sharing this amazing tutorial. I am preparing all the tools and materials needed so I will be able to start sewing it tomorrow.
CONGRATULATIONS!!!
Olga Balasa
Monday 27th of June 2022
Thank you! If you make it and want to share, please send me a photo and I will publish it.
Susan Ramsay
Monday 21st of September 2020
I have a "Lularose" box pleated skirt made from knit fabric. I thought I might duplicate it in another color for myself. It has about a 2.5 inch waistband with wide elastic. It's so comfortable. No lining, so I wear a 1/2 slip. The youngsters won't know what I am talking about! Anyhow, I wondered why you don't recommend knits. This skirt I have is a bit heavier weight than a cheap T-shirt, but not heavy like "Ponte de Roma" ( I thinks that's the name of it.) In the late 60's early 70's we made a lot of slacks with it.
Olga Balasa
Monday 21st of September 2020
Susan, I didn't recommend knits for the particular pleated skirt because first, I didn't want to make an elastic waist, I wanted to make the skirt with a zipper and a regular waistband and it's obviously not good for knits. Second, for knit fabric we use different sewing techniques, I love to sew knits with a serger and it was not my intension for this pleated skirt tutorial - I didn't want to teach people how to sew knits. But it's completely possible to make a pleated skirt from knit fabric, only it will be different design and different process. If you would like to make your skirt from knit fabric you can use the same pattern, just make an elastic waistband and use your serger to sew the skirt.