
In this sewing tutorial, I will show you how I made an applique pillow. There are numerous ways to create pillows using different applique techniques. For my pillow, I used a little bit unusual applique technique together with cutting a butterfly shape with a Cricut machine. Why is it unusual? Because I used different color fabric strips to make the applique as you can see in the image below.

Note: Some of the links on this page are affiliate links. This means I will receive a commission if you order a product through one of my links. I only recommend products I believe in and use myself.
Beautiful and original accessories breathe life into even the most boring interiors. And handmade pillows are unique because two identical things simply do not exist. Do you think it is difficult to make decorative pillows? Not at all! You do not need special sewing skills, years of experience, or extensive knowledge. Even a beginner can create a pillow. All you need is a desire, some fabric, and a pinch of inspiration. And you need no zipper because it’s an “envelope” pillow cover.
Before you sew a pillow, you should carefully consider the material from which it will be made. It is important to choose fabrics for which care will be as simple as possible. Moreover, the material should not be electrified during use or attract dust.
I have chosen a plain light grey cotton fabric (with some metallic threads) for the pillow. I think a colorful applique looks better on plain fabric than on printed fabric. And for my applique, I used strips of spandex fabric (left from my previous projects). But I think any fabric can be used as long as it’s many different colors and it doesn’t fray extensively.
Prewash the fabric before sewing if you plan to wash the pillow cover.
You will need an SVG file for the butterfly. You can buy one in the Silhouette Design Store, they have thousands of cutting files available. That’s where I got my butterfly SVG cutting file. Choose a design with many open spaces so the strips of different color fabrics can be seen.


I used a small premade pillow form for my project and I made a cover for it with the butterfly applique. The pillow measured 14” x 14” so I did easy calculations for how I should cut my fabric.
First I decided how wide I should cut the fabric for my pillow. So, it’s 14” plus ⅝ seams allowances on each side and it is 15 inches and a quarter.
Now I have to calculate how long I should cut my fabric. So, it has to be 2 times 14” equal 28 inches plus 5/8” for seam allowances on each side plus about 3 inches for making the so-called “envelope” pillowcase where the fabric is overlapping. Total 32 ¼”.
The next step was cutting the fabric strips for the applique. I used 7 colors, and cut each strip using my rotary cutter and a cutting mat. Each strip was inches 1 3/4″ wide and the length was about 12 inches. I sewed all the strips together with my serger and pressed the seam allowances on one side.

After that, I had to find the position of my butterfly on the piece of fabric I cut for the pillow. It was easy to do: I just took the premade pillow form, covered it with my fabric, and marked the center front with a fabric marker.
I placed the prepared strips on the right side of the grey fabric (using pins) and determined the optimal position, put my butterfly paper template (cut with a Cricut) on it, and made an outline with the fabric marker.
After that, I just sewed regular stitches over the marked outline making sure that the fabric doesn’t move from its place and is sewn without folds and wrinkles.

The next step was cutting the applique close to the stitches. For this, I have my duckbill scissors. If you want to make appliques use these scissors, they are just wonderful for cutting very close to stitches. And I am not afraid to make a wrong cut if I am using my duckbill scissors. Scissors for appliques should be sharp so they don’t “chew” the fabric.
I like these scissors so much that I wrote a separate article about them here: Duckbill Scissors: What They Are And How To Use Them. I particularly like the Gingher brand (which I have) but there are others less expensive also.


Ok, now the butterfly is attached to the fabric. I decided to use iron-on glitter vinyl for my butterfly. So I cut the butterfly shape with my Cricut and attached the gold butterfly to the applique with a hot iron. It was so easy! But I used a press cloth to protect the work.


The butterfly applique is completely ready and looks good and I proceed to finish my pillow cover.
For this, I double-folded the short edges under to the wrong side and stitched them.


I decided to use French seams for my pillow cover. So I folded the pillow cover WRONG SIDES TOGETHER matching the raw edges and sewed the edges using my serger – I used a regular 3 thread 1 needle serger stitch. The back panels will overlap in the middle by approximately 4 inches.
If you want to know how to sew French seams using your serger check out my tutorial on French seams. 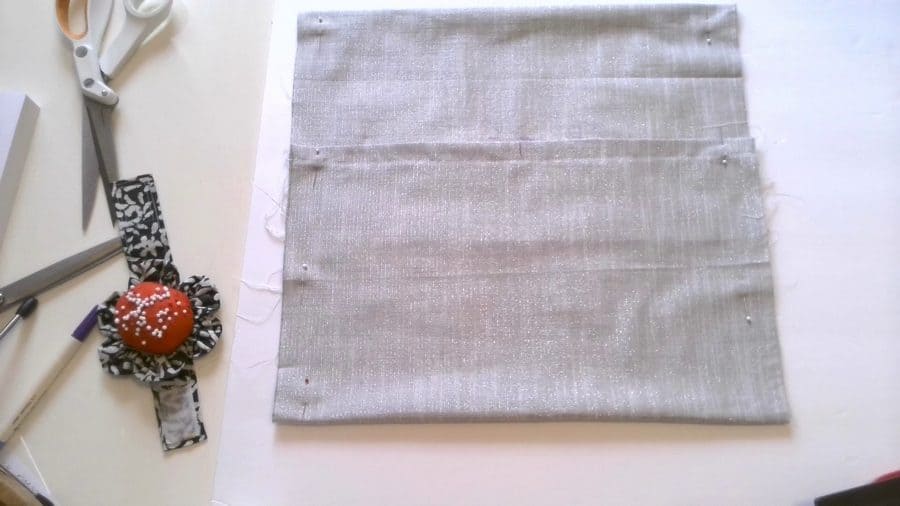


After that, I turned the pillow to the wrong side and ironed the edges. Next, I sewed the edges using my regular sewing machine leaving ¼-inch seam allowances. French seams are perfect for decorative pillows. 


Now I turn the pillow cover to the right side, pushing out the corners carefully, press the seams (using a press cloth to protect the applique) and insert the pillow form inside. My wonderful butterfly pillow is ready! You can use this tutorial to make your own decorative pillow. And you can share what you made in my Facebook group Sewing tips and tutorials. 

If you are interested in my other fast and easy sewing projects check out these tutorials:


Did you find this tutorial helpful? If so, save this pin (see below) on your sewing board so you can come to this tutorial later when you are ready to sew your applique pillow, and follow me on Pinterest for more tips, tutorials, and inspiration!


Ready to take the next step in your sewing journey? Check out more step-by-step tutorials from my blog and don’t forget to share!


latest posts
- Think You Know Zippers? This Installation Guide Might Surprise You
- Why Does Your Seam Ripper Have a Red Ball? Discover Its Purpose!
- Topstitching Troubles? This Simple Trick Will Turn It Around Instantly!
- How to Sew Shirring: A Step-by-Step Guide to Elastic Thread Gathering
- Are Self-Threading Needles Really Useful?
- Amazon Spring Sale: Best Choices
- Elevate Your Prom Look: A Guide to 10 Neckline Choices (2024)
- No Pattern, No Problem: Turn Scraps into a Quilting Masterpiece
- Prom Perfection: A Guide to Choosing the Perfect Dress Color (2024)
